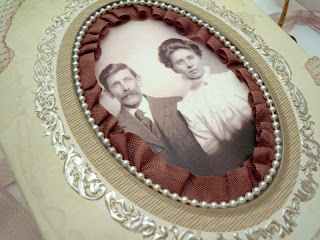
Alpha Stamps is hosting another fabulous swap, a Cabinet Card Curiosities Swap.
I had an absolute ball creating samples for this "slightly off" swap.
The cover of the Cabinet Cards were supposed to be traditional, very Cabinet Card-esque. So all I did was add some traditional classy bits, some Cocoa Seam Binding (this color is absolutely scrumptious!), Pearl Strand, enhanced the oval frame with some Platinum Pearl Liquid Pearls and finished it off with a few bits of paper from the Postale Paper Pad.
But then came the fun part, the "slightly off" bit.
Maybe it's because I have been doing so many Alice in Wonderland pieces or possibly just because I have always been obsessed with what may be on the other side of the mirror, but I decided to Mirror image everything as my "slightly off" bit.
So I found some mirrors at the local craft store and went to work to make them look vintage.
You will need:
Mirror
Paint Stripper
Paint Brush
Plastic putty knife (must be plastic!)
Latex gloves (or something to protect you if you are allergic)
Muriatic Acid
Spray Bottle
Rag
Black flat spray paint
Something to protect your surface (cardboard box)
Step 1:
Coat the back of your mirror with Paint Stripper, I like Klen-Strip KS-3 Premium because it is a thick paste that is easy to brush on.
Follow the manufacturers instructions.
Step 2:
Use your plastic putty scraper to remove the backing on the mirror. It must be plastic, metal ones will scratch the glass.
You might have to repeat Step 1 a few times in order to remove all the layers of paint. All the black and the orange needs to be removed.
This is what my mirror looked like after the first stripping. I had to do 3 in order to remove all of the orange paint. Be very careful, the layer under the orange is the mirror.
Step 3:
Mix Muriatic Acid (can be found in the pool section or paint section at hardware stores) with water in a spray bottle.
Step 4:
Spray the back of the mirror with your Muriatic Acid mixture.
**As you can see the back of my mirror still has the orange backing, I had a very hard time getting it off of this mirror so I decided to see if the Muriatic Acid would eat through it. It did not, so I went back to the paint stripper. I did try later straight Muriatic Acid on the back, and after removing the black paint on the back of the mirror the acid did eat through the orange and silvering of the mirror.
Your Mirror should be silver on the back when you spray it with the Muriatic Acid.
So after you spray let the Muriatic Acid eat the silvering until you like the look and then take your rag and dab off the excess.
Step 5:
Wash your mirror
If you are pleased with the amount of silver that you have removed move onto the final step.
If you would like to add an image now is the time. Glue it to the back of the mirror and let it dry completely.
Step 6:
Spray the back of your mirror with the spray paint and let it dry.
All Done!
Here are some mini mirrors that I did the same way.
To attach the front and back of my cabinet cards I created an accordion folded piece and glued pockets to the different layers of the accordion fold.
I made tags to go inside the pockets.
And printed out some great images from the
Cab Card Cuties Collage Sheet
Cab Card Cuties Collage Sheet
And mirror imaged them on the back of the tags.
For the final page I Mirror Imaged the front cover that I created. The only difference is that I used a lighter shade of seam binding, this time I used Rose Beige.
I finished the back off with a White Bone Flower and some mini velvet leaves
This was a fun project to create and the mirror I think really adds a lot. It is a very simple process and doesn't take much time either.
I hope this tutorial inspires you to try out some Mirror Aging.


5 comments:
Amazing!
As a fellow Wonderland enthusiast this is such a wonderful project and tutorial! Thanks so much for sharing. I can't wait to try this :)
Amy*
Love your beautiful project! Great tutorial. I love learning new techniques.
Interesting. Can't wait to try it.
awesome Caroline
I love your cabinet card filled with surprises. fabulous art. The tutorial looks fun to try.
susan s.
Post a Comment