Wednesday, October 12, 2016

Halloween Bits and Bobs

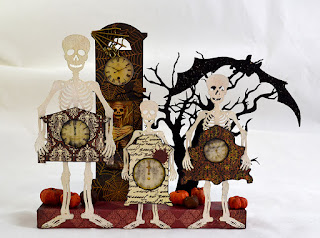
 Halloween is one of my favorite times of the year and Alpha Stamps knows a thing or two about doing Halloween up right!  This months kits, Halloween Clock Kit,  could go Halloween or Victorian.  So versatile, but of course I went Creepy.
 This is my, Time Stands Still for No Man, piece.  I used a bunch of chipboard bits from the kit along with the Creepy Critters Shape Set, Creepy Tree 5", and the Skeleton Shape Set.  The grandfather clock in the back has an image from the Death Cards Collage Sheet and a spider web charm
 The clock faces are from the Halloween clock faces Collage Sheet and coated with Diamond Glaze.  The bat flying ominously over the skeletons is coated in black glitter.  And pumpkins dot the ground behind the skeletons.
 I couldn't stop playing with skeletons, but switched to a bit of a brighter project using the Tim Holtz Day of the Dead stamps.
 What I love about this set is that each image comes in two sizes.  So for the larger candles I used the larger image and of course for the smaller candles, the smaller image.
I used a tissue paper technique on these.  Each was stamped and then carefully colored using colored pencils before melting them into the candle slightly.  

Well, I am off to create some more Halloween goodies.  I hope you have a wonderful spooky day and thanks for stopping by.  

Friday, September 9, 2016

The Crows Muse

 Halloween is just around the corner...oh how I love Halloween!
Leslie, over at Alpha Stamps, let me play a bit off the reservation this month (I love her almost as much as I love Halloween).  I have been wanting to make a doll similar to the one in the photo below.
I found it on pinterest and it has no link, just a photo, sorry.  Clearly mine is much different, but that is the difference between being inspired and learning by copying.
I started with a floral cone and a deconstructed barbie.  I cut the floral cone to size and then hollowed it out so that the body of the barbie would slip inside.   I decoupaged the cone with old newspaper.  You can't put hot glue directly on the Styrofoam cone, it will melt it. And then I painted it black so you can't see any of the newspaper bits through her rather sheer skirt (Oh the scandal!).
The barbie body is covered with book print (alas nothing by Poe, just some old scifi novel that fell apart on me).  For a head I used a relic and artifacts cast - figurehead.  
From the front it looks like these small feathered crows are single wings.  
From the back you can see that they are two separate crows.  I like to think that they are holding her up as well as helping her fly. 
The spot where her head meets her body is hidden with a black seam binding bow.
 Her bodice is black seam binding.  Black roses in various sizes cascade down her skirt.  Interspersed with lustrous rhinestones.  
 In the folds of her gown she conceals a fabulous chipboard chandelier complete with crows! 
 Her skirt is layers and layer of Tulle.  There is also Tulle wound in and out of the chandelier. To me it almost looks like a spider web or all that stuff they hang from furniture bits in haunted houses.   
And of course it wouldn't be complete without a sparkly spider.   Liquid pearls form the beading work on the chandelier.  
I hope you enjoy my Crows Muse.  She was fun to make
Thanks for stopping by.
I wrote this post while under the influence of decongestants and running noses, sorry if it is a little scattered.  

Monday, August 29, 2016

Ever After 2016 Art Class

 I took a leap this summer and decided to join Tamara Laporte's Ever After Class.  This is my first ever online art class and my first ever faces class.  I have to say that I am thrilled with this class.
The above photo is the class taught by the uber talented Annie Hamman.  We were to follow her instruction video and create what you see above (her's was a bit different, well, a lot different, but I tried).  She is all acrylics.
After each class we are supposed to take what we have learned and make it ours.  This is my interpretation of the fairy tale Snow White.  
I used an image I found on Pinterest as my inspiration.  I tried to follow the image to get to the photographer's info but alas It leads down a rabbit hole.

I still have a lot to learn, but I am quite tickled with myself, after all I have never drawn or painted anything like this before.  

I am having so much fun that I have signed up for Annie Hamman's Soulful Story Art Class.

Saturday, August 6, 2016

Mermaid Cabana Totem

What more do I need to say?  
 Mermaids don't have their cabanas all in a row (Cabana row house set), theirs go up, like sea grass and coral reefs.  
Inside their cabanas they not only change their tops but also put on their legs.  That's right, this cabana is run by Ursula!  
The entire piece is built on top of a piece of wood covered in sand.  Pieces from the Seaside Doors and Windows Set help make these little houses look like they are being used.
 Once the mermaids (Chipboard Mermaid Miniatures) change they can be seen swimming all around.
 The mermaids are painted solid black so that they stand out.  Fish from the Fishtales Collage sheet swim all around the cabanas with them.
 I used a bunch of paints to create the stripes and paint the bits and pieces.  To mute the paint tones I brushed a big of Vintage Photo distress Ink all over the cabanas.
 In addition to the doors and windows bits from the Seaside Decor and beach umbrellas chipboard set help decorate the cabanas.  
  Images from the Bathing Beauties #3 Collage sheet and Beauties by the Sea Collage Sheet peek out from behind the windows.
The roofs are made from Natural Raffia.
Surrounding the entire piece are palm trees.  Yes,  I know there are no palm trees on the bottom of the Ocean but in Ursula's world there are.
To top the entire totem, a lone miniature white beach chair is perched, from here Ursula can watch all that happens in her domain.

Once again Alpha Stamps has out done themselves with this fun kit!
Thanks so much for stopping by, now go hang by the pool because it is one hot day!

Saturday, June 11, 2016

Down the Rabbit hole

 I'm still playing with Alpha Stamps Alice in an Altoid Tin Kit from last month.  This time I decided to honor the white rabbit because without him would there even be an Alice in Wonderland? 
The complete supply list for this project can be found HERE.
 Everything always starts off looking all innocent.  After all Alice was just having a book read to her when she fell down the hole.  To create the tree stump I cut a medicine bottle in half, covered it with crumbled masking tape which I then covered with crumpled tissue paper and painted with various shades of brown acrylics. 
Miniature pink geraniums dot the moss coated ground. 
The roots were created by rolling masking tape into shape and affixing them to the bottle. 
Hard to believe it is all built on top of an altoid tin.
 When you open the tin you can see the white rabbit (yes, he is black here...it is a shadow) fleeing back towards Wonderland.  An Altoids tin insert frame sets the backdrop for the white rabbit to flee towards the hole.
The mushrooms are painted with gold leaf and some other shimmery bits that I had lying around.  Fern and flower buds (not red or white because we haven't met the Queen yet) surround the rabbit as he heads towards his hole.
 Bits and pieces of Wonderland are all around the hole.  A bronze stopwatch, a drink me medicine vial (hard to see but it is in the upper right hand corner, see that bit of gold, that is the stopper) and down the hole is the key that Alice needs. 
This was a fun project and now all I want to do is make more tree stumps. 
Thanks for stopping by!  And make sure to check out Alpha Stamps latest kit Beneath the Sea, you know I am going to have a ton of fun with this one!

Wednesday, May 25, 2016

Queen of Hearts Deck of cards Case

 Where do all the Queen of Hearts Red knights go when not on duty?  Simple, into her Deck holder. 
I love Alice in Wonderland and right now so does Alpha Stamps!  There kit this month is Alice in a Tin. I've done Alice tins before but I think this one is my favorite, because it is functional. 
All the supplies I used can be found HERE.
Of course the Queen of Heart starts her day by ordering the White Rabbit to call all her Red Knights to duty. 
 She spies white flowers among her prized red roses on the trellis by her bedroom window which  incenses her. 
 Of course her run in with a girl named Alice is still fresh on her mind making her burn with fury deep inside her evil gut. 
 After all Alice helped her idiotic Red Knights paint the white roses red.  What kind of nincompoop aids in such a vile act?
 They must be punished and put away.
 Inside two altoid tin bottoms hinged together using the Altoids Tin Book Covers with a minor alteration to the spine to make it wider is where the Red Knights will be kept. 
 A mini collage of all things Queen of Hearts fills one tin.  Looked over by miniature playing cards.
The Red Knights tuck themselves away in their red velvet bed until the Queen of Hearts calls on them again tomorrow.  

Tuesday, May 10, 2016

She could not be caged

 I've been wanting to try my hand at some canvas work since visiting an antique store and felling in love with a collaged cow.  So, when Alpha Stamps Birds and Cages kit arrived I knew exactly what I was going to do.
 
The cages that no longer hold my bird are the 2", 3" and 4" die cut chipboard.  They come with backs, so I've squirreled those away to use another day. Just did a coat of brown paint and then dry brushed on some lighter brown, tan and white to give them more depth.
 For the bird I drew out a shape and then decoupaged over it using the Serendipity Glee Scrapbook paper.  The eye is an Antique Brass birdhouse charm.
The lovely lady is from the My Graceful Figure Collage Sheet.  One of my favorite things about this piece is the bright shinny gold leaf that I put here and there around the edge.  I just love how it contrasts with the blues and pinks. 
 
I think for a first go this one's not bad.  Now I just need to start making them bigger and bigger.  The cow was 40" x 40"!
 
Thanks for stopping by!

Saturday, February 27, 2016

Tunnel of Love Book

 This past August my baby sister walked down the aisle.  One of the wedding games was a fun musical chair, search the crowd for items, game.  Well, I got picked to play and represent my lovely sister.  Alas, I did not win (I let a flower girl win ;) Anyways, participants were given a month throughout the year to send postcards to the newly wed couple, I received February.  Well, y'all know I don't do postcards, something about the flat thing just trips me up LOL.  So, this is what I created a Tunnel book filled with love poems for her using the fabulous new Alpha Stamps kit.
The album comes with one page cut for the window and a number of additional whole pages.  I decided to make a tunnel book so I cut arches in each page, but the last one.  The arches get smaller and smaller the further into the book you go.  
HERE is a list of a number of the supplies I used.

The cover page is thicker than all the other pages so that I could dangle the birds without them hitting the window or damaging the pages behind them.  To hide the ugly sides of the foam core I wrapped the foam using brown seam binding.  The birds are hanging on fishing line.
 I painted each page with distress paints in various shades.  I also used some acrylics I had on hand to get the shades just right.  I was attempting to match the background color with the torn paper bits (Friendship, Charmed, Petite moments and Adorn papers) you see on each page.  
To finish off the background each page is randomly stamped with various stamps, Boho Paisley clear stamp, Old letter writing rubber stamp (on every page), Fleur De Lis Bird and Arrow Clear Stamp Set, Damask Study Clear Stamp (all stamps found on link above).
 Birds on branches frame this pages window arch.
 And you know I had to pull out my Ice Resin and make some goodies.  The flourishes are molded from the Architectural Flourishes Mold.  The heart is a mold I made from a charm I had laying around.  To add a bit of depth to the colors of the pieces I brushed on some Lumiere Metallic Gold, I also brushed this onto all the flowers throughout the entire book.
  On each page is printed a love poem (or part of one).  The text was printed using my printer onto Provence French Quarter 12x12 paper which I then cut out and placed on each page.  
This is a snipet from Shakespeare's Sonnet 116.
 A strip of Provincial Cobblestone 12x12 paper binds the inner pages together.  I must thank Tristan Robin Blackman of Enchanted Revelries for helping me with how to bind the massively 3D pages.  
 Check out how the scene in the arch changes with each turn of a page!  
This page features an image from the Mischievous Cupid Collage Sheet that I have loved and not had a use for until this project, heck, I probably did this entire project just so I could use this image.  
 Bunches and bunches of flowers!
The edge of each of the torn pages has been rubbed with Antique Linen Distress Ink (leaving it white was too harsh even though there was white on many of the papers).  
A portion of [i carry your heart with me (i carry it in)] by e.e. cummings (one of my personal favorites) is on this page.  
 Just a note on the order of steps for the background pages.  I started by painting the pages all an off white, then stamped before adding the color.  The papers went on next and finally a light brushing of white over everything.  
 Roses from the Pink Roses Collage sheet are highlighted on the third page.  A bit of chipboard balcony with Ice Resin pots filled with flowers finishes off the page.
 This is the first time I have mixed Acrylic paint into my Ice resin and I like the result.  It is flat (unlike powders that I typically add) but a bit of the gold paint fixed that right up.  It would also serve as a great piece to add a rub-on or sticker to.   
Y'all see that fabulous stitched leaf ribbon in a lot of my pieces.  I just love the stuff.  So of course the chipboard balcony had to have some growing on it.  
 A bit of William Blake's The Clod and the Pebble is featured on this page.  
When pulling a book together that has images you can see the backs of, make sure you cover them with pretty paper, it just takes it the extra mile in my opinion.  
 
 This page was fun, and different, to pull together, because I needed an entire scene instead of just window framing.  
 The new Leafy corners chipboard adds a bit of a frame to the top portion of the page.  I enhanced it with some fern garland and small pale pink mulberry blossoms.
 Images from the Vintage Postcard Faries Collage Sheet are all over this page along with some columns from the Garden Columns Collage Sheet.
 The final poem is by Eliza Acton a section of her I Love Thee poem.  
I'm sure you realized that this is one thick book with all those embellishments.  So there was a massive side panel to decorate.  I used a large image from The balcony Collage Sheet.  Hid the fact that it doesn't reach the top of bottom with torn bits of paper and added a small bird.  
The embellishments on the front cover spill over onto the side.  To me it looks like the vines from the image are wrapping around to the front. 

One last look at the tunnel.  
Thanks so much for stopping by.