Wednesday, December 16, 2015

Reindeer do Fly!

 Sleigh kits!  
Need I say more?
This month Alpha Stamps is all about the Sleigh. Be them big, little, flat or 3D.  What is a sleigh without some Reindeer.  Have no fear, Alpha Stamps has them too and boy did I have a great time playing with all these goodies.
So grab some hot chocolate, eggnog, hot toddy, etc and enjoy!
 I'll start with the simple and work my way up to the flying reindeer, because, well there is a story there LOL.
I used the Chipboard Sleigh to hold all of Santa's presents.
HERE is a link to most of the supplies I used from Alpha Stamps.
To achieve the rich red on the sleigh I started by stamping the Fancy Flourish Clear Stamp, painted over that with red paint, grunged up the edges with some black ink and then painted over it all with crackle distress paint.
 In my world everyone is nice and Santa's sleigh is overfilled to the point that the reindeer get extra feed.
The gifts are 7/8" wooden cube blocks wrapped in Christmastime paper.  Oh my, these are stunning, I prefer the 6x6 pieces because the pattern/designs are smaller.  Wrapping ribbon around them would have hidden the pretty patterns so I used gold mini rosette Dresden boarders to act like ribbon and then tied a bit of seam binding to make the bow on top.
 Along all the edges of Santa's sleigh is rich gold metallic single loop braid ribbon. The rest of the swirls that are on the sleigh are painted with metallic gold paint and coated with gold stickles.
 I made a bunch of wreaths for this project, and I mean a bunch.  Tim Holtz's pine twine came in very handy. To accent the wreaths on the sleigh I added small pine cones,  ribbon from the Christmas set, and a few of the red glittered holy berries.  Everything, and I mean everything, got a dusting of extra fine white glitter. A small snowflake charm, that I painted gold, hangs in the center of this wreath.
And here is what inspired all those wreaths.  
I wanted something to break up the sled, why not some greenery and a charm.  I used more of those holy berries, small pine cones, clear acrylic spray that I coated in olive alcohol ink, and the deer charm. Once this became part of the sleigh it was only natural for the rest of the sleigh to get a wreath concoction too. There is a wreath on the front and back of the sleigh.  
 Okay, so here is where my art brain went a bit wild.  
When I envisioned this piece it had flying reindeer. I approached my husband to see if he could help me with this.  He of course said yes because he is a HUGE enabler ;)  We scoured the internet for bits and found some carousel pieces that would work.  Alas, we couldn't get our hands on those because the poor woman broke her arm.  Did that deter us, nope.  We built our own!
We shot for the moon and landed among the stars.
Before I get to the moving parts let's pause and pay homage to Rudolf.  You knew I was going to light something up ;)  
Rudolf is a chipboard reindeer covered in the scrumptious Christmastime paper with a wreath around his dainty neck and gold metallic mini braid ribbon for a harness. His nose is, and this is ironic, Red Demon Eyes - LED lights-large.  I removed one of the red lights and hid the wires with a wired pine needle stem wrapped around Rudolf post and then a gift strategically placed in front of the switch and battery pack.  
Okay onto flight!
As I mentioned earlier we shot for the moon and landed in the stars.  Only one set of the reindeer currently move, but we have a plan to fix that.  As soon as we get all the kinks worked out I will repost.
 Once everything is moving correctly I will attach the lead lines.  I have gold DMC thread and some fabulous beads (minuscule ones) from Alpha Stamps to put on it.
 So all that machinery needed a home and that home needed some decoration. 
The tree's are from a fabulous pack that makes 3D trees (they should be HERE) by slipping two of them together.  I didn't need anything 3D (OMG that is the first time I have ever said that!) so I did not put them together, instead I covered them with paper and added some glitter.
 For the houses I used Black chipboard windows and Die-cut chipboard houses with windows.  And do you see what I see?  Yep, more wreaths.  I made most of them, but the two here are tiny felt wreath stickers.  
Each house is outlined in a narrow gold fleur dresden boarder.  Can you believe this is my first time using this bit of Dresden?  One of my new favorites for sure. 
 It is impossible to see in the photos, but all the windows are coated in the distress rock candy crackle.  
The base is finished off with more garland and star tinsel
Well, that's it.
Thanks so much for stopping by.  
I am off to get myself a cup of hot chocolate and watch my reindeer fly!
Happy Holiday's to all!

Saturday, November 14, 2015

Angel Wing Advent Calendar Shadowbox ~ Multiple Tutorials


 Does it seem like my projects keep getting more and more complicated?  Don't blame me, blame Alpha Stamps.  What else is a girl to make with goodies like the ones in the 
First things first, how in the world does the box go together?  
When I poured the pieces onto my workbench my stomach dropped.  Mistletoe and Tensile!
After a couple of tries I figured it out.  Thank goodness I didn't start gluing with my initial idea.  Hopefully this video will help you put yours together without pulling your hair out and driving you to drink copious amounts of eggnog.    
 Okay, hard part behind.  Now onto the fun stuff.
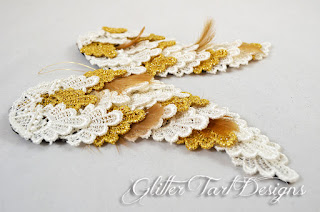
If you take a close look, I don't have a box 25.  The instructions say the 25th box can be placed at your discretion.  Problem is, I am not a boxy type of gall.  So from the start I planned on leaving it out.  But what to put in its place, because what fun is there in not opening something on the night before Christmas.  Eureka!  A special ornament to go on the tree.  That's what the wings are. 
 Scrumptious lace!  So in love with this stuff.  So of course I had to use it.  
The laces are the same design just different colors.  Metallic Gold 1 3/4" Fancy Venice Lace and Ivory 1 3/4" Fancy Venice Lace.
Massive Supply list at the bottom of this post.
Check out how they lay like real feathers!  
There are a few real feathers mixed in here and there.  
Check out the Tutorial Video to see how I created these wings.
Yep, that light is on. 
Alpha Stamps carries the coolest little LED lights.  
There are directions on how to add them on the product page at Alpha Stamps.  However, I happen to have some experience with wiring so I rewired mine.  All the wires and switches come out the back and are nestled inside box number 1.  When I want to turn them on I open box one and hit the switches.  Don't you think that is a great way to start the advent calendar adventure?  May not be candy, but heck you get to light it up!.  
I am working on a video tutorial to show how I did this.  
 This project could not take a stark black lamp so I brushed on some brown paint and a bit of  Lumiere Metallic Acrylic Paint - Metallic Gold.  I used this paint all over the project.  It is quite bold, to tone it down I applied a minuscule amount with my finger and rubbed it around.  
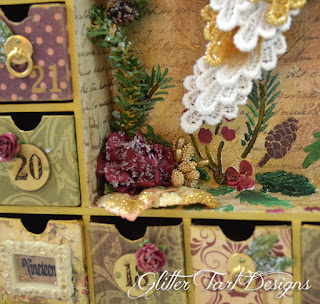
 The back of the shadow box needed to be pretty when the wings were removed.  There are a multitude of layers creating the look.  
Script stamps come in so handy, don't know what I would do without them.  This one is the Wendy Vecchi Cling Stamp - Script.  I also used two Tim Holtz Stencil's Christmas Text and Festive.
Quick note on my drawers.  
I covered the pre-cut drawers with papers from the kit and my stash and used a variety of items for numbers and decoration. 
 All of the greenery and flowers in the shadowbox has a sprinkling of Twinklets Diamond Dust.  I prefer this product over glitter when trying to accomplish a snow dusting effect because it is semi-transparent.  
 Inside each drawer is a piece of chocolate.  It is wrapped with a strip of paper, tied with a bit of tulle with a 1" Burgundy Paper Rose on top.
 When the candy is removed you're in for a little surprise.  Each box has a holiday themed collage sheet image inside.
 This post could go on and on.  If you have questions about what I did not cover, or only glossed over please e-mail me or write it in a comment. 

Supplies
marked with an *

Numbered boxes
*Papers from the Victorian Christmas Scrapbook paper Set
*Numbers from the Advent Calendar Add-On Kit
*Pre-Cut Drawers
*Brimstone Damask Scrapbook paper
*Brilliance Pigment Ink Pad - Galaxy Gold
Petite Resin Frame Set
*Diamond Glaze
*Faux Metal Number Plates 1 to 25
*Liquid Pearls - Avocado
*Serengeti 6x6 paper pad
*Small Ivory Cherub Buttons
*Stitched Leaf Ribbon - Moss Green
*Tiny Faux Ring Handles
*VersaMark Watermark Stamp Pad
Gold Embossing powder
*Twinklets Diamond Dust

Shadowbox 
Tissue Paper
Permanent Brown Ink Pad
*Wendy Vecchi Cling Stamp - Script
*Tim Holtz Stencil - Christmas text
*Tim Holtz Stencil - Festive
Texture paste
Twinkling H2O's
*Clear Acrylic Bead Sprays - Asymmetrical
*Fancy Gold Holly Berries Mix
*Large Bronze Fancy Filigree Set
*Lumiere Metallic Acrylic Paint - Metallic Gold
*Mini Rose Buds - Burgundy
*Seam Binding - Tans
*Twinklets Diamond Dust
*Wall Sconce Victorian Coach Lamp
*Wired Pine Needle Stems
Mini pine cones

Wings
Fabric
Lightweight Cardboard
Wire
Complete detailed list of supplies on Video

Box Treats
Candy
*A Victorian Christmas Scrapbook paper set
*Hanging by the Chimney with Care Collage Sheet
*1" Burgundy paper roses
gold tulle


Thanks so much for stopping by.  
I hope you have enjoyed your time here and that my piece has inspired you to go out and make your own!

Friday, November 13, 2015

Angel Wing Template

I've been making some Angel Wings for the upcoming holiday.  I scoured the web for a decent template and could not find one.  Most posts said to just draw the wing, well, I'm not the best at free hand drawing.  I managed to pull these off.  I hope that you can get some use from them.

Click image to go to a full size printable page.

Stay tuned, I've used these in a project I will be sharing very soon.

Thanks for stopping by and please share your creations using this template with me.

Saturday, October 31, 2015

Advent Calendar Shadow Box Assembly

 I'd say it's beginning to look a lot like Christmas, but I'm one of those -Wait, what about Turkey Day- kind of person.  Regardless, it is time to get started on some of those Holiday Projects that don't involve a skeleton, witch or Zombie.  Alpha Stamps has the absolute coolest 
 Advent Calendar Shadowbox (or just shadow box if Christmas isn't your thing. I am so thinking this would be the funnest Alice in Wonderland project ever!).
 So endless possibilities of Sugar Plum Fairies, Santa Workshops, Cindy Lou Who, and Nativity Scenes, comes in THIS condition.  OMG, talk about a major, What do I do now moment!
I froze, blinked a couple of times, went and got a glass of wine (it may have been hard liquor)  and stared at it...got very boring.  
But have no fear!  I figured it out and put together this quick video to wash away your frustrations.  I hope it helps, and if you have any other questions let me know.  While this post might not contain completed pictures of my project, which is on my workbench right now, I have pulled it all together and it awaits it's photo-shot.  
Thanks for stopping by!

Thursday, October 22, 2015

Mischief of the Mistletoe, The Glitter Tart's take

Yep, I know not a very good picture.  I am learning the latest Power Point, was using 7, so there is a BIG difference.  I'll get it but for now please bear with me.  

Anyways...
I am a member of an ATC group, Stamp Out Crime.  We read a mystery, create an ATC and share it.  This is my submission this time.  It is based off of Lauren Willig's book The Mischief of the Mistletoe. I am working my way through this series, so far I have read six and created ATC's to go along with them.  You can view the others under the label Stamp Out Crime.
These are fun little Romance mysteries, I have to have me some romance.   
 Alas there is nothing too special about these.  I had to make 8 so I didn't want to go crazy, I've done that in the past.  The snowflake is Masonite that I painted gold.  I roughed up the edges of the paper a bit and rubbed them with gold ink.  
This was the tricky part.  Mistletoe is not out in stores yet and all the how to's online created pieces way too big for what I needed.  Yes, yes, I know what your thinking, just shrink it.  But then these poor little eyes of mine would have hated me!  And I do try to make them happy most of the time.  So I used fabric leaves, yup, and strung seed beads onto fishing line to mimic the white berries.  

Overall I am pleased.  I found it a lot harder to go back to card/ATC making than I thought.  I have to say I do prefer the 3D and altered art a bit more, but it is nice to know that I can still knock out something presentable.

Thanks for visiting!

Saturday, October 3, 2015

The Tea Princesses Crown with Two Toned Ribbon Leaf Tutorial

Okay gang, steep a bag, don your finest attire, pull out all the bling, and sit back and relax while you check out The Tea Princesses Crown.

I have been itching to create a crown, for some reason they always seemed so intimidating, but when I set my mind to it and received this months kit, Provence French Country, from Alpha Stamps, everything fell into place.

The frame of the crown was created using the 2 3/4" wide Ivory Venice Lace (Massive Supply list HERE).  The Ivory was a little too light in my opinion, had a cup of coffee sitting next to me (Yes, I know!  I'm a traitor, but it was early early in the morning, don't tell the Tea Princess!) so in went the lace and out came this gorgeous color.  Next I soaked it in Plaid Stiffy Fabric Stiffener (from local craft store), set it flat to dry.  When it was dry I soaked it a second time and wrapped it around a massive cylindrical tube.  Had to pin it in a few places to keep it on.

 Once it was dry it was time to get crackin'.  
For the focal point I used a chipboard Tea Cup from the Teaparty Chipboard Die-Cut set and glued on an image from the Sweet Tea Collage Sheet.  The image was a bit too grey for the crown so she got brushed with Vintage Photo Distress Ink and Galaxy Gold Ink
For some reason I just couldn't wrap my mind around how to make the saucer look like a saucer, where to draw what lines etc...so I covered it up with a crown from the Royal Icons Silicone Mold.  All the molded items on the crown I created using hot glue.  
A few weeks ago I created a tutorial for how I did that.  
What tea cup doesn't need some filigree behind it?  
This piece is from the Large Bronze Fancy Filigree Set.  To make it fit for a royal, I painted it with a coat of Lumiere Metallic Acrylic Paint in Metallic Gold.  It took on this amazing depth of color. To make my other pieces look the same I first painted them with a coat of black acrylic paint and then covered it with the Metallic Gold.  I did this on everything you see gold, all the molds and the triple pearl pins (they were originally pearl colored).

To fancify the tea cup's handle I added a flourish from the Small Flourishes Silicone Mold and a bow from the mini bows silicone mold.
Flowers, flowers everywhere!  
Seam binding roses are such great filler.  The pink, tan and blue seam binding are from the Provence Seam binding set (oh, these colors are so luscious).  For the leaves, Serbian Brown, from the Art Nouveau seam binding set.  Do you see that little tip of Spice (burn orange) coming out of the center flowers leaf?  I'm going to show you how to do that!  That shade of seam binding is from the On the Boardwalk seam binding set.
But I didn't stop there, That luscious velvet flower is a Vintage Velvet Hydrangea.  I painted it's center with a bit of the gold.  I didn't think about making the center of the seam binding roses gold until after I'd sewn on the pearls from the cream pearl assortment, and well, I didn't want to get gold on the flowers, so no gold centers.
When I was thinking about what kind of tutorial I would like to do for this project (there has been a request for simpler tutorials and projects, and well, this is not a simple project) I decided I wanted to show how to make the ribbon leaves. They add so much to the little seam binding roses and other purchased flowers that don't come with enough leaves.  You can never have enough leaves.  But how to make it mine, new and original?  So I stared at the pile of ribbon on my desk, and stared and then light bulb!  Why not make the leaves two toned?  The above image shows two toned leaves using the 1 1/2" moss green satin ribbon and a darker green I found at the craft store.  The flower I enhanced with these leaves is from the Calla Lilies and Berries pack, in Ivory.

The secret to this process is that your ribbons need to be the same width or equal the overall size.  So one ribbon can be 1 1/2" and the inside ribbon can be 1 3/4".  
But more on that later.
Onto the side.  
Wrapped around the entire crown is a tea themed boarder cut from the Tea time boarder die.  The rich paper I cut it from is in the Provence 12x12 Collection pack, so many rich and detailed papers.  A strand of white (not after I painted them ;) plastic pearls also wraps around the crown.
Another Calla Lily, this time with simple leaves, not two toned, Brass Flatware spoon,  and a vintage velvet pansy (amber yellow) create the side focal point.  
There is one on each side of the crown.
Can't leave the back plain now can I?  
More Filigree painted with gold and seam binding roses adorn the back.
The stick pins I used I have coveted for years, this was the perfect project for them, alas they are no longer made.  But, don't despair, they are easy to make.  
You will need some head pins, like THESE, and a mix of pearl sizes (the cream pearl assortment is perfect for this).  
Thread those pearls on, put a dab of glossy accents between them and paint them.  
Voila your very own pearl stick pins, they won't look exactly like these, but they will be darn close.
I've spent most of this post focused on the large two toned leaves, but look here, you can make them itty bitty too!

Here is that Tutorial I keep speaking of
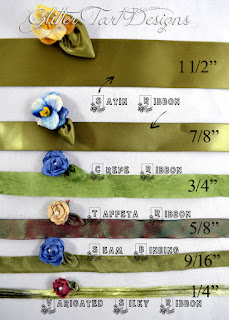
Now a bit more detail on the leaves and what size ribbons work best for what size flower.  All of the following images are in the video, but here they are for your staring pleasure.
All of these ribbons are available at Alpha Stamps and most of them are on the massive supply list.  
 1 1/2" Moss Green Satin Ribbon
 Top: 7/8" Satin Ribbon shown with the velvet pansy
Bottom:  Olive Crepe Ribbon shown with a seam binding rose made with a dine as the template.
 Top:  Variegated Silky Rayon ribbon
Bottom:  Seam Binding
The smallest flower in my collection of paper flowers that was not a bud.  We are talking pencil eraser size.
Thank you so much for stopping by.  
I hope you enjoyed your tea and my Tea Princess crown.  

Names of all the supplies I used from Alpha Stamps
Most of them can be found HERE
2-3/4" Wide Ivory Venice Lace
Brass Flatware*
Calla Lilies & Berries - Ivory
Cream Pearl Assortment
Crepe Ribbon - Olive
Large Bronze Fancy Filigree Set*
Lumiere Metallic Acrylic Paint - Metallic Gold*
Mini Bows Silicone Mold*
Moss Green 1-1/2 Inch Satin Ribbon
Moss Green 7/8 Inch Satin Ribbon
On the Boardwalk Seam Binding Set
Provence 12x12 Collection Pack
Provence French Country Kit - October 2015
Provence Seam Binding Set
Seam Binding - Art Nouveau Colors
Silicone Mold - Royal Icons
Silicone Mold - Small Flourishes*
Silicone Molds - Alphabet
Soft Taffeta Ribbons
Sweet Tea Collage Sheet
Tea Time Border Die
Teaparty Chipboard Die-Cut Set*
Variegated Silky Rayon Ribbons
Vintage Photo Distress Ink & Stain Set
Vintage Velvet Hydrangea Picks - Cream
Vintage Velvet Pansies - Amber Yellow
White Plastic Pearls (Strands)

Saturday, September 26, 2015

Hidden Skeleton Haunted House with Tutorial

 September is all about Haunted Houses over at Alpha Stamps.  This months Haunted House Kit is filled with spectacular goodies to make your very own.
Y'all know I loves me some Halloween art!
 I went back to some of my old ways and favorite crafting tools, ICE Resin.  
HERE is an old tutorial on how I created the cut outs (windows and skeleton opening) and filled them with Resin.   
 The window features an image from the A Witchy Encore Collage Sheet.  She is backed with a bit of decorative paper so she shows pretty when looking from the other side.  Iridescent micro beads are sprinkled onto the surface of the resin to try to make the "glass" look older.

To create the window frame I added Textured Sand Paste to a Black Chipboard Window Frame.  Let that dry, meanwhile I made the window arch (not really an arch and alas using a sold out mold, sorry. Something from the Architectural Flourishes would work.) and then painted everything. 
 Now, my favorite bit, what could be spookier than a Skeleton hiding in your walls!?!
The same resin method was used for this cut out, except I added a bit of silver pearl ex powder.  
I used the smallest skeleton from the Skeleton Chipboard Set.  Painted him white, Picket Fence Distress paint, (boy that was stark, seriously who has a bleached skeleton in their walls?) so added some cream, then brushed on some Pumice stone distress paint, and peeled paint distress paint.  

I just wanted him to peek through so I covered the entire house with wood siding (Going for that creepy Victorian look).  I cut them out of a dark green piece of matte board (1/4" wide) then I brushed on a layer of cream and dusted them with Vintage Photo Distress Ink, To add a bit more aging along the edges/bottoms of the slats I swiped Vintage Photo Distress Stain along the edges and rubbed it in/around with my finger.  When I glued the prepared slats down I cut them and spread them out a little to expose the skeleton.
The attic window has a spider web image from the Black and White Halloween Boarders Transparency collage sheet.  The owl embellishment was created using the Birds and Butterflies Silicone Mold and for the window frame I used the Ornaments and Settings Silicone Mold.
This is what inspired the entire project!  I wanted to make this roof!  
So, if you're counting, I have 7 embellishments on this project using various molds.  I did not have weeks to wait for resin to dry or paper-clay to air, so I used hot glue.  Yep all those embellishments were done in a matter of minutes.  

Here is a tutorial on how easy this technique is and many uses for the embellishments.

To make the project stand, so I could put a candle behind it and light up the windows, I created a base to connect a dowel rod to and added two zombies.  They are filled with sand to act as counter weights because all that matte board and hot glue embellishments is a bit heavy.

Thanks so much for stopping by.
I hope you enjoyed the piece and that the tutorial was helpful.

For a complete list of all the wonderful Alpha Stamps supplies I used  go HERE.