Tuesday, September 11, 2012

Get your Cards Read

 
It's that time, time for all of the Gypsy Swap pieces to be in the mail. 
 
 
You should see the pile of swap packages I've gotten so far, and I know there are still more to come.
 
 
If you missed out on this swap, have no fear, all the Alpha Stamps Swaps are Great.  The next swap is a Cabinet Card Curiosities swap. 
 
 
So, today I am sharing the last Gypsy caravan piece that I created.  Have you ever had your Cards read?  I haven't but think it would be fun.
 
 
I hope everyone is having a wonderful day.  Come join us over at Alpha Stamps, the swaps are great!

Monday, September 10, 2012

Dulche de Leche filled Buttermilk Cupcakes with Dulce de Leche Cream Cheese Frosting topped with Pink sea salt and Ganache

I was cruising Pinterest a while back and found
Stuffed Dulce de Leche Cupcakes with Salted Milk Chocolate
Image from The Cottage Market
I knew right off I had to make these so I took a trip over to The Cottage Market.  Since I started making cupcakes I have discovered a few things, I don't like confectioners sugar frosting, and I have discovered the secret behind the best Ganace ever.  So I made a few changes. 


My cupcakes didn't turn out nearly as pretty as hers, but I wasn't given a chance by my family to get any other photos but this one.  Guess that means they are good. 
 
The cake recipe that The Cottage market shared was from Smitten Kitchen and it was very similar to my Buttermilk Cake recipe, except she uses all cake flour.  I love my Buttermilk Cake recipe but decided to change it a bit and did use some cake flour.  It was a good change.
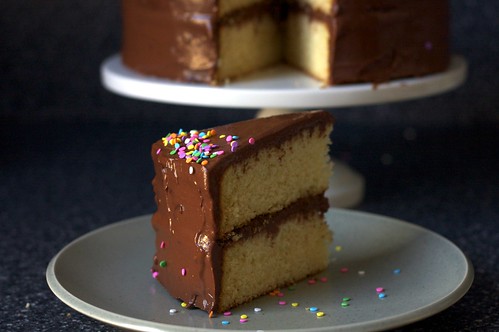
 

Image from the Smitten kitchen
 
Ingredients
 
Cupcake
3 cups flour
1 cup cake flour
2 teaspoons baking powder
1 1/2 teaspoons baking soda
2 sticks (1 Cup) unsalted butter at room temperature
2 cups sugar
2 teaspoons pure vanilla extract
4 large eggs at room temperature
2 cups buttermilk at room temperature
 
Filling
1 can sweetened condensed milk
 
Frosting
8 oz cream cheese room temperature
1/2 cup prepared dulche de leche (recipe to follow)
1/2 cup butter room temperature
1 1/2 cup sugar
1/3 cup flour
1 1/2 cup whole milk
1/3 cup heavy cream
1 teaspoon vanilla extracts
 
Topping
3 tablespoons corn syrup
6 ounces heavy cream
12 ounces dark chocolate, chopped into small pieces
1/2 teaspoon vanilla extract
Pink Himalayan Sea Salt (or any salt you want)
 
Preparation
 
Filling
Dulce de Leche
- Remove paper from the can of sweetened condensed milk a put in a large pot filled with water.  Boil for about 3 hours (not a roaring boil, but nice and hot)
- Let cool
-  This step can be done days in advance.
 
Cupcakes
-Preheat oven to 350 degrees Fahrenheit
-  Grease or line cupcake tins
- In a mixer, cream butter and sugar together until light and fluffy
-  Add eggs one at a time until yellow disappears
-in a separate bowl sift together all dry ingredients
-  Alternate adding dry ingredients with buttermilk into the butter and sugar mixture starting and ending with dry ingredients.
-  Add vanilla
-  Bake 25 to 30 minutes
-  Allow to cool
-  Fill cupcakes with prepared filling by cutting out a plug or piping into the cupcake
 
Frosting
-  In a saucepan whisk flour and sugar together
-  add milk and cream
-  Cook over medium heat until boils and thickens (about 12 minutes)
-  Transfer to a mixing bowl and beat on high until cool (about 10 minutes)
-  Turn mixer to low and add cream cheese and butter a little at a time
-  Add prepared Dulce de Leche and vanilla
-  turn mixer up and bead until light and fluffy
 
Topping
-  In a small saucepan combine the syrup and the heavy cream
-  Bring to a boil
-  Remove from heat
-  Add chocolate, let melt
-  Stir
-  Add vanilla
- Dollop onto cupcakes and then sprinkle with salt
 
 
Image from The Cottage Market
 I hope you enjoy the changes I made.  I had fun experimenting and eating these.

Sunday, September 9, 2012

Cabinet Card Curiosities Swap


Alpha Stamps is  hosting a Cabinet Card Curiosities Swap using Cab Card Frame Sets!
Cabinet Card Curiosities!! You could make your Cabinet Card a single family member, siblings, an entire family, pets or perhaps just of grandma, who has been locked away in the basement for years and years, or...?! The people may outwardly appear to be normal — but open up the Cabinet Card and there's a completely different side of them in their true colors!
 
This swap will be 1 for 1: create 1 Cabinet Card Curiosity and receive 1 in return from another artist! Please do not send in more than TWO sets (aka: maximum of 2 Cabinet Cards).
 
 
For more information (and/or to sign up by September 30, 2012), visit the Yahoo Group. Artwork will be due October 15, 2012.
 
And there's a Cabinet Card Curiosities Swap Supplies Sale (including SIX fabulous NEW Collage Sheets designed specifically for this swap)!
 
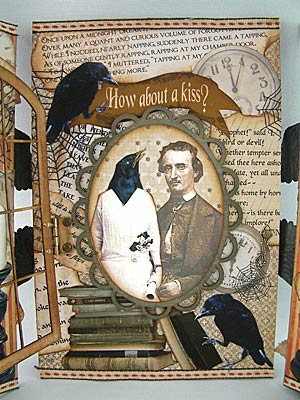
Check out this wonderful Poe inspired piece by Laura Carson and view more artwork in the Cabinet Card Curiosities Swap Gallery!
 
 
NEW Prizes!!
Each player who completes the swap will receive an exclusive collage sheet from Alpha Stamps!
 
There will also be a chance for each player who completes the swap to win $100 of NEW Halloween goodies from Alpha Stamps.
 
So hurry over and sign up, because I can't wait to see what everyone creates!

Art Share ~ Monica of Art Rocks


Monica of Art Rocks put together this page for the Circle of Friends chunky Alice book swap.  I love how she has added gold and glitter swirls behind the rabit to make him look like he is running.

Saturday, September 8, 2012

Farm Finds

 
Last weekend I decided to take a trip around the farm and collect some fabulous natural goodies to use in my art as well as to decorate the house with.
 

The long leaf pine (at least I think that is what the pines are called) are too young to have any cones on them yet, but when they do they will be big ones.  For now I am settling for these nice normal and mini ones. 


Last year on Pinterest I found an image where a woman had painted all her acorns turquoise and put them in a pretty jar.  Well turquoise does not go in my house so no painted, yet.  And I couldn't resist the caps, they are a wonderful texture and I have an idea for turning them into old fashioned ornaments.
 
 
I couldn't leave without collecting some exotic looking chicken feathers.  I can't wait until October when the chickens really start to loose their feathers. 
 
Come on Fall, I'm ready for you!

Art Share ~ Sarette

 
Sarette, the mind behind Stamp Out Crime, put these fun Alice in Wonderland pages together for the Circle of Friends Chunky Alice book. 
 
 
She was super sweet and made some extras for my girls.  I've bound them for them and they love their little Alice Books.

Friday, September 7, 2012

Looking For Salvation at the Dairy Queen by Susan Gregg Gilmore

 
Sometimes you have to return to the place where you began, to arrive at the place where you belong.

It’s the early 1970s. The town of Ringgold, Georgia, has a population of 1,923, one traffic light, one Dairy Queen, and one Catherine Grace Cline. The daughter of Ringgold’s third-generation Baptist preacher, Catherine Grace is quick-witted, more than a little stubborn, and dying to escape her small-town life.

Every Saturday afternoon, she sits at the Dairy Queen, eating Dilly Bars and plotting her getaway to the big city of Atlanta. And when, with the help of a family friend, the dream becomes a reality, Catherine Grace immediately packs her bags, leaving her family and the boy she loves to claim the life she’s always imagined. But before things have even begun to get off the ground in Atlanta, tragedy brings her back home. As a series of extraordinary events alters her perspective–and sweeping changes come to Ringgold itself–Catherine Grace begins to wonder if her place in the world may actually be, against all odds, right where she began.
 
Review
 
I enjoyed this book, it was a wonderful summer read for me.  My mother grew up in a small town and a lot of things in this book made me think about what my mothers childhood might have been like.


The book is broken up into section, starting with "The Gospel According to Catherine Grace Cline"  Susan instantly sets the scene with the language and characters names.  I really like this approach as opposed to labeling the section with the location and date.  Susan goes a step further by setting the date by writing it into the story through Catherine's eyes "Every night he would get comfortable in his reclining chair, turn on the television, and then let Walter Cronkite convince him that the world was much to dangerous for anyone he loved.  Boys were getting themselves blown up every day in some country I knew nothing about.  Grown women were pulling of their bras and burning them in broad daylight for everyone to see.  And a man named Martin Luther King was telling the black people they deserved a better life..." (pg 10)


Looking for Salvation at the Dairy Queen is a coming of Age Novel that begins with Catherine Grace Cline at 9 and takes her up through graduation.  Catherine puts off a very "The Grass is Always Greener on the other side" view on most things, not liking her small town and the way that many southerners show love, through food.  The irony that she doesn't particularly like this practice isn't lost on the reader when Catherine herself starts to make money by selling food.  She does it to save up and escape town though. 
 
 
Catherine's family life resembles a scenario I am starting to get very tired of when books have younger characters.  The one parent scenario.  Catherine's mother is dead, and her father is the Reverend in this small town.  I found Reverend Klyne reminiscent of Dimsdale in the Scarlett Letter, not a good thing, talk about a crappy character. 
 
Susan did write in a mother figure for Catherine Grace, Gloria Jean, who is a wonderful woman but looked down on by the town because she is not married and very concerned with her appearance. 
 
 
The only major problem with the book is that many of the events came off as contrived.  Especially those that take place at the Dairy Queen.  Since I was looking for an easy read this didn't bother me but I can see how other readers may be bothered by this. 
 
 
I really liked all the food chat in the book, tomatoes, strawberry jam, blueberry picking, dilly bars etc...I have never had a dilly bar and don't have a Dairy Queen anywhere close so I think I might try to make some. 


I will let you know how they turn out.  I plan on reading Susan's other book, The Improper Life of Bezillia Grove, maybe I will make the bars and sit out on the porch and read. 


Thanks so much for visiting my blog.  If you know of a good book please share it with Ricki at Art @ Home, because I want to know about it too!
 

Art Share ~ Andrea

 
Andrea created these wonderful pages for the Circle of Friends Chunky Alice book. 
 
 
When I opened the package and saw this one I was in heaven.  I love how she mixed the two stories together and asked her if I could steal the idea for the next Circle of Friends Round Robbin Journal that I am putting together right now.  

Thursday, September 6, 2012

Polymer Clay Roses ~ Tutorial

 
Today I am sharing another Alice in Wonderland page that I created.  Just like last time I wanted to pick a scene that is not commonly depicted in art so I selected "Painting the Roses Red."
 
 
I had a better idea how to make this theme work for two reasons.  I knew Alpha Stamps had a wonderful image of Alice with the cards and I had already tried my hand at Polymer Clay Roses. 
 
 
Instead of telling you how I created the entire piece I am going to focus on the Polymer clay roses, for more information about how I did the other steps just leave me a comment and I will get in touch with you.
 
Supplies
Polymer Clay
Oven/Toaster Oven
Paints
Brushes
 
 After you have softened your clay by squishing the mess out of it (yes that is all very technical) form about 10 or so small balls. 


Next you want to flatten out those balls.  I do this by just pressing them in between my fingers until they are oval shaped.  Also, try to keep the thickness of each fairly close, the thinner they are the harder they are to work with. 


This step may take you a few tries.  That's fine (hell it took me about a million and then my little sister showing me what she was doing).  You want to roll one of the ovals tightly to form the center of your rose. 
 
Kind of pinch one lower corner of the oval and roll it towards the opposite sides middle.
 
 
It should look something like this.
 
 
Now it's time to start adding the petals.  Pick up another oval and affix it to your center so that the top of the oval is slightly higher than the center.  Then gently press the bottom of the oval (long ways) against the center until the oval is entirely on the center.  Do not worry if it overlaps or is short. 
 
 
To make it look more petal like carefully pinch and pull at the edge that is sticking out above the center.
  
 
Attach the next oval so it is slightly above the previous one and starts a little bit before the previous petal ended.  Follow the same procedure explained above to attach each petal.
 
 
Keep working your way around until you like the way your flower looks.
 
 
Your flowers will not be exactly the same.  Which makes them look more natural.  Bellow I have two full flowers I made in the same sitting and one rose bud.  To make a rose bud just keep everything tighter and attach fewer petals.
 
 
When you are shaping all your roses follow the polymer clay manufacturing instructions to bake. 
If you over bake a bit and they turn a little brown that's fine because you are going to paint them.
 
 
I used 3 different shades of pink, spritzed this with walnut ink and then sprayed it with a high gloss sealant (just because I wanted a shiny finish).  You can paint yours any color combination.
 
I hope my instructions are helpful, I know explaining this can be a bit tricky.  I've created a video that may help.  Please excuse the kids, wandering husband and nosy cat. 


 Thank you so much for visiting my blog.  I hope you have a great time creating your own roses. 
 
Now onto some fun stuff. 
It's a giveaway with everything you need to make your own Alice page!


Collage Images
Roses (unpainted)
Ribbons
Leaves
beads
Mini playing cards


And they will all show up to one lucky winners home nicely packaged. 

How to win???
Leave a comment with the following
1. Name
2. Way to contact
3. MOST IMPORTANT, that you want to be entered in the giveaway.
Winner will be announced Wednesday
  September 12th


Good Luck and thanks for visiting. 

Alice in Wonderland Winner!

 
I'm late I'm late for a very important date!
 
So sorry gang, yesterday didn't go as I had expected.  But have no fear I am here now to announce the winner of last weeks Alice in Wonderland Goodie Bag.
 

The Winner is.....
 
and that is
 
Tristan Robin Blakeman who  said...
oh, my, how could I not want to be entered?! Of course I want to be entered. Your mixed-media collage is absolutely enchanting - I love it!
 
Congratulations!!!
You can contact me at ouztshay@google.com
 
Thank you all so much for viewing my tutorial and for your wonderful comments.