Saturday, October 8, 2011

On A Shoestring ~ Local Antique/Junk Shop


A few weeks ago my super sweet husband took me out for breakfast and to a local Antique store (the first I've been to in the area since moving).  With the move funds are tight but I saw a bunch of things I wanted needed.


So yesterday I went and added these precious 1960's prints to my collection.  The frames aren't in good condition but the pictures are just perfect for my little girls room.  And since framing was my first crafty endeavour I know I can fix them, or make new ones. 


Oh and they gave me a great deal when I said "I want the all or none at all!"  Half price!


But it was these goblets that had been keeping me up at night...calling to me...screaming actually :)  They are silver plate, but that's not a big deal to me, there is not a ding or a scratch on them.  I can't wait to polish them up and use them.  Look for them in an upcoming blog party!

So if you are in the area, make a trip over to On a Shoestring they have some great old windows, furniture, a few typewriters, tons of colored glass, and vintage jewelry.  It is a great place to stop!

Friday, October 7, 2011

Off with Your Head (if you don't sign up for my swap ;)


Here is another one of my Alice Tea Themed Tea Pots for the swap I am hositng for Alpha Stamps.  Just think, this could be yours if you join the swap. 


Think Alice in Wonderland, rabbits, tea, teacups, cupcakes, assorted sweets, Queens, grinning cats, hats, and things that aren't quite what they appear to be!

This swap will be 3 for 3. (Create 3 book pages (not the covers) and receive 3 in return, all by different artists!) Please do not send in more than TWO sets (aka: maximum of 6 pages).

For more information (and/or to sign up by October 9, 2011), visit the Yahoo Group. Artwork will be due November 7, 2011.


And don't forget to join in on the fabulous Giveaway Alpha Stamps has put together to go along with this swap.  Go HERE to put your name in the hat.

I am so looking forward to seeing all the wonderful piece everyone creates and to swap them out. 


Thursday, October 6, 2011

Halloween Light Charms or Fan Pulls


I picked up these fabulous light charms at Hobby Lobby a few weeks ago and they've just been sitting on my workbench.  Well, that was until yesterday when I decided that a few of my ceiling fans needed some halloween decor.


These were super easy to make, the color is Tim Holtz alcohol ink that I applied directly to the crystal and moved around a bit with the tips of the applicator bottle (no blending solution)


The images are stamped on transparency film, cut to fit and applied with glossy accents. 


And of course I had to add some ribbon.  What you can't really see in the photo's are the black rhinestones all over the ribbon. 

Enjoy!  Because I am :)

Stamped images are from Alpha Stamps

Monday, October 3, 2011

Stamping on Candles ~ Tutorial


Wouldn’t it be great to make any candle look the way you want it to? Well, here is a simple, step by step tutorial on how to make your very own hand stamped candles. 
They are great for home decoration, gifts to family and friends, house warming gifts, the list goes on and on. 
However if you simply don’t have the time, or the touch, you can purchase them from my Etsy shop (and of course I’m open to custom orders)


Supplies
White Tissue Paper
Candle (White words best but any candle that you can get a matching tissue paper for will work as long as it’s not so dark the stamping won’t show up)
Ink (I like Archival ink because it dries fast)
Stamps
Scissors
Heat Gun
Wax Paper
Rhinestones (optional)

Step 1:  Measure Tissue Paper

Note:  You only need to do this step if you want a stamped image to wrap around the candle.  If this doesn't apply to you please skip to step 2. 

Wrap tissue paper around candle until it meets, mark and cut tissue paper. 

It's okay if there is a bit of overhang it can be trimmed later. 


Step 2: Stamp Images

Ink your stamp and stamp directly onto the tissue paper making sure to press evenly.  If doing a wrap around (like my words) you might want to draw a line to keep images straight.


If you wanted to at this point you can color your images using permanent markers or colored pencils, don't use something that will run when heated/dampened. 

Step 3:  Cut Images Out


Using a sharp pair of scissors trim your stamped images closely.  It doesn't have to be precise. 

Step 4:  Add Bling

Note:  If you prefer your candles blingless skip to step 5


Place any rhinestones where you would like them on the tissue paper.  Make sure that they are stuck on well.

Step 5:  Place Images


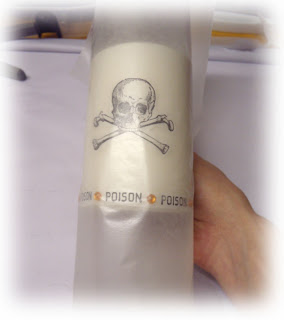
This is where things get a bit complicated and you might wish you had a third or fourth hand.  Place your trimmed images where you would like them on the candle and press them down as best you can (this picture was taken before I pressed, the wax in the candle will grab portions of the tissue paper).

Step 6:  Wrap candle in wax paper


Tear off a piece of wax paper, make sure it is large enough that you can grab a portion and pinch it together tightly around the candle.  This is what you will hold onto while heating to prevent burning your fingers.

Step 7:  Heat

 I apologise that there are no pictures of me heating the candle, I needed that extra hand :)

Turn on your heat gun and let it get hot. 
Holding the gun about 12 inches from the candle, heat, moving the gun (or the candle whichever is more comfortable for you) constantly.

You can tell when it is done when the image gets darker (kind of like embossing powder).  As soon as it is done remove from heat, don't want to melt the candle!

Pull the wax paper away slowly, if you find spots that are not fully adhered to candle, reheat them. 

Done!


I love the way these make my dinning room look!  They are such a subtle but perfect addition. 

Please share with me any creations you come up with, I love seeing other's art. 

Again, if you just aren't crafty you can purchase these from my Etsy shop, HERE is a direct link. 

Sunday, October 2, 2011

I'm Late I'm late...no your not! and a Giveaway


This is another one of my Alice In Wonderland themed Tea Pot's for the Alpha Stamp swap I'm hosting.  And there is still time for you to sign up. 

This swap will be 3 for 3. (Create 3 book pages (not the covers) and receive 3 in return, all by different artists!) Please do not send in more than TWO sets (aka: maximum of 6 pages).
For more information (and/or to sign up by October 9, 2011), visit the Yahoo Group. Artwork will be due November 7, 2011.


I tried to make it look like the White Rabbit was being poured out of the small tea pot (and isn't that a wonderful tea pot!) 


This was the first tea pot I made, and the first art project I made, in the new house and I am thrilled that Leslie, owner of Alpha Stamps, has selected this image to advertise the swap. 

You can view the other Tea Pot I've posted HERE

Now onto the fabulous Giveaway that Alpha Stamps is offering.  It's Alice themed!


Go HERE to sign up for it, you have until Oct 9th. 

Good Luck!  And go sign up for my swap, I want to see your fabulous creations!

Saturday, October 1, 2011

Skull and Crossbones Rosettes


It's that time of year where all my art projects seem to take on a rather spooky feel. 


This month the Circle of Friends had a Halloween themed swap and this is what I created.


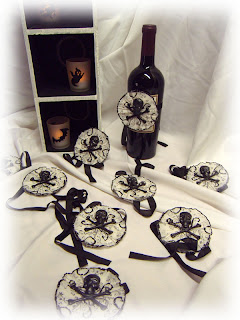
Skull and Crossbones glittered Rosettes!  Talk about mixing elegance with the spooky ;)


I wanted the members receiving my creation to have a few options on how to use them.  The first option is to tie it around something, a wine bottle, small pumpkin, broom handle (since all witches need a bit of bling on their broom handle) etc. using the fabulous black seam binding I added.


Or they can use it as a magnet and let the seam binding hang down. 

I made a few extra and you can have one too!  I've loaded them into my Etsy store.  Mention this post and I'll throw in a fabulous Witch Black Glittered Magnetic Clothes Pin.

Enjoy!

Friday, September 30, 2011

Garden Party ~ Altered Pages Altered Board Book Swap


 Altered Pages Yahoo Group hosted an altered board book swap.  Participants altered a book to send to one partner, the theme was open.  This is what I came up with. 
All floral collage images are from Altered Pages


 I've never done an altered book from start to finish, I've always elaborated with other artists so this was a huge undertaking for me.  I hope you enjoy my Garden Party. 


Page 1 and 2


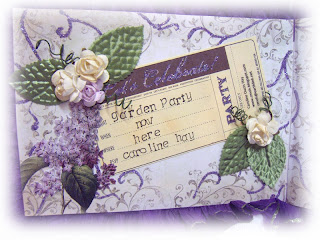
 My book starts with an invitation to a Garden Party.


Page 2 has a lovely image (all adult female images are from Artfully Musing Free Downloads) of the party hostess.


The frame is one that I make and I'm trying to get some in my Etsy shop.  You can't tell in the photo but it is shimmery.


I told a little story with my book, I hope you enjoy it.  The story portion will be in italics.


 Page 3 and 4


Lady Heidi Hydrangea and Princess Penelope Poppy are the first to arrive and they brought their prize winning cake.


 Next comes Countess Isabel Iris with her gaggle of puppies.  I count them at night, instead of sheep, when I can't sleep.


The dogs hat is from Altered Pages


Page 5 and 6


Followed by the Deacons wife Daphne Daffodil who has the most lovely singing voice.  How magnificent she has brought the Church linens to top our table with.


I hate to tute my own horn but I love how I added the rhinestones to the music notes.  I think I would have enjoyed music much more if there had been rhinestones on my sheet music in high school.


Oh how wonderful her Royal Highness Roberta Rose is here.  And she is accompanied by her charming daughter Bethany Bluebell.  What's she looking at?


I did a lot of work on the background of this page.  All the depths don't show in the pictures.  I stamped a column of roses and then a column of crowns painted them and then did a wash over them.

The little girl is from Altered Pages


Do you see the hidden roses?


Are you ready for the next page?  At the last minute I did the different layers of crepe paper to try and make it look sky like. 


It's the Butterflies!  They've decided to join us.


The background paper is glittery as are touches of the butterflies. 
All Collage images on this page are from Altered Pages


Page 9 and 10


Now let's sit and chat a bit.


I used real tea leaves to decorate the edges of the rosettes, it makes the entire book smell scrumptious!


Would you like some fresh strawberries from my garden to go with your cake? 


Page 11 and 12

Oh how the time does fly.  It's growing late and time to say farewell. 


Again I played with crepe paper, light blue for daytime and black for night I love the effect it gives the page. 


This is the final page in the book.  It's supposed to be a Thank You from the hostess to her guests or vice versa.  I needed more space than I had left over to give the proper credits for each page. 

 See, it barely all fits and I am sure I left something out!


The back cover is simple. 
I love my altered book and had a very hard time mailing it out today.  I  hope who I mailed it too (shhh it's still a secret) loves it as much as I do.