Showing posts with label Zuzu's Petal and Buds. Show all posts

Thursday, July 15, 2010

Knock Knock

This project is killing two birds with one stone. It is for a swap and it is my One Powerful Hour entry this week. One Powerful Hour challenged it's participants to "be inspired" by the design team. I took inspiration from two of the team members and worked it into my swap piece.

Gillian a member of one of the swapping groups I am a part of had some wonderful metal houses that she put up for a swap. I am so glad that I took part in this swap because I absolutely love the metal house, hopefully I can find some more.

She left the theme open, all we had to do was use the house that she sent us.

I have never worked with anything like this before and when I took it out of the package some of the paint (I guess that is what was on it) was flaking off. I pealed a lot of it off and then put a coat of white gesso on the entire thing thinking that this would help hold anything that I stuck onto the house.

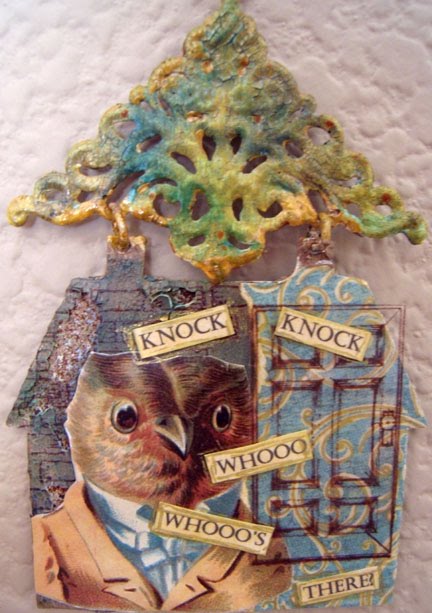
After the Gesso dried I added Tim Holtz crackle paint to the top part of the house and then dabbed the entire thing with various shades of Tim Holtz alcohol inks. I love how the alcohol ink seeped into the cracks it really gave it an 'old' feel in my opinion. The Tim Holtz bits were inspired by Nancy at NJP Originals she loves all things Tim Holtz.

Next I added the paper bit which I filled in the swirls with gold ink...I got this idea from Amy at Paper and Gluestix she likes to doodle on her pieces and while I wish my doodling was a little bit more free form I thought it would count for inspiration.

To be honest I had no idea what I was going to do with this house so I flipped through my binder of Collage Images and came upon this owl from a Paula's kit Club. Another thing Amy does on may of her pieces of art is put fun sayings some doddled others clipped and outlined. I came up with my own saying attached it and outlined it in the same gold that I used to accent the swirls.

Lastly I added the door which is stamped using brown ink on transparency.

I really like how my house turned out and hope that my swap partner likes it as much as I do.


Tuesday, October 27, 2009

Hocus Pocus


Over at Zuzu's Petal and Buds Forum it's time to exchange a Halloween themed piece and here is what I have made.

This did not turn out the way I wanted it to at all. I wanted it to be orange in majority but not the orange I ended up getting. Everything went south when I went with a 2 step crackling technique that has never failed me before but either my paint was old or my crackle medium because it did not crackle at all...in fact it was down right ugly what happened. So I tried to save it by wiping the orange paint off but I wasn't pleased with that look either. So after getting all the elements together I decided to try and hide the ugly paint with glitter...I thought I would never say this but I think this piece has too much glitter on it.

The image is from Alpha Stamps and so is the fabulous chip board cut out of the spider web. You can't tell but I wrapped it in an off white fuzzy fabric...it really is a cool effect.

I'm hoping that the person that receives this likes it and that maybe I don't like it because it wasn't what I envisioned and I can't get over that. All in all I am really disappointed in this piece.

Saturday, January 31, 2009

National Foof Day

What is National Foof Day? Well, it is in celebration of a word that came about on Zuzu's Petal and Buds forum, kinda to replace tut...but it grew in its uses...

So, in honor of the wonderfully fun word a swap was proposed and had more participation than any other swap I have been in so far.

What was the swap? Create a piece of art that represents the word Foof to you. So, without further ado, here is my foof.

At first I was going to do a play on words and make a "Fooftastic recipe box" but I got as far as prepping the box...then it sat there waiting for me to finish but it just wasn't quite right.

So, one night I woke up with this idea...

I wanted something a bit cheeky but yet still feminine so i decided on this design...and it took every bit of my paper crafting and sewing skills to pull it off...


The First thing I did was to make the doll...I stamped and colored the face and then attached all the body parts (everything was stamped and or cut out of white cardstock) I attached them using some lovely pearl brads (very feminine) I am not an artist, well, at least not one with painting and drawing...so eluding to the "parts" a woman would have was difficult but I am pleased with the "hidden assets" I gave my doll...

To add some interest to the doll I gave her some stockings made out of a shimmery twaul (I have no idea how to spell that word) and for the garters I used thin ribbon and some fabric flowers.

The last touch on the "inside" of my Foof was to create a mirror for her to hold. I went back and forth as to weather to actually include this part or not...in the end I included it and slipped it in her hands.

The Doll was then glued to the floral background paper which is spritzed with gold Glimmer Mist.

To make the curtains I stamped a decorative background stamp using gold shimmery fabric paint on a green cotton. I sewed the edges under and threaded some pipe cleaners through he top and bottom. I then hand sewed them down... To hide a few of the messier sewing holes and pipe cleaner I added some gold glitter at the top and bottom.

The doors of her dressing room are attached with pink brads and the last touch was pink eyelets with ribbon strung through to keep the doors closed. The inside of the doors are lined with a pink shimmery cardstock.


I finished the piece off with some Gold German scrap along the top and a shear gold ribbon to hand her from.

I hope my Foof recipient enjoys my Foof...I had a lot of fun making her...

Friday, December 12, 2008

By The Sea

I signed up for an upcoming Altered Tin swap. Actually, I didn't make the deadline I was hemming and hawing about it for so long. But they let me join in anyway and boy and I glad they did.

This is my first ever Altered Tin so I wanted to get a head start on it in case it did not turn out. Well, it did, actually I would say it is pretty darn close to exactly what I envisioned.

I decided to go with a Treasure Chest type theme. I have always loved the beach, it is fun and romantic and carefree and dangerous all at the same time. Plus many of my favorite childhood memories are from times my family spent on the beach. So here is my own personal beach to carry around with me...although I am giving it away...because I live no where near the beach.

Before starting I sanded the tin and coated it with PVA and then a layer of Gesso. When all that prep was done I affixed the female image and painted around her with a crackle paint that I later aged a little with some brown ink. I sealed that and added various rocks and real sea shells!

Inside I coated it entirely with sand, yes, real sand. The inside top has one of my favorite sayings by William Blake stamped on a handmade paper that to me kinda resembled a rocky beach. The inside bottom (deep section) is what I am most proud of. I cut out various sea shells from an old post card and coated them with clear embossing powder and then elevated them to various heights inside the tin on small wooden dowels. Down in the bottom of the tin I added some rocks and sea shells.

All around the outside of the tin I attached various beads and other ephemeral that reminded me of the beach/ocean/sea. I did this by first punching holes in the tin with an awl and then looping fishing wire through them. This step was actually done before I did any work on the inside of the tin.

To finish it all off I attached a mermaid charm that I aged with some rust colored Alcohol ink and a sand colored thread (the only thing I don't like). They guard the treasure inside.