Friday, August 31, 2012

Silk or Linen, 12th Anniversary


12 years ago, I said "Yes" to the most fabulous man alive (go ahead try to argue with me, you will loose ;). 
 
Since then we have lived in 7 different homes, have loved and lost a wonderful dog, increased out cat count to 3 (how did this happen!) and had 2 out of this world awesome little girls.  There have been good times and bad and really bad and we have weathered it all.
 
So do I get Silk or Linen for this anniversary?  Or is it Pearls (the modern day gift).  Believe it or not I don't want any of those things.
 
My fabulous husband is taking me out on a date!  With no kids!  Back where it all started, Auburn.  Tonight we will put on clothing that hasn't been snotted on, cat furred all over, or seen the outside of our closets for a very long time and head to Warehouse Bistro
 
Here's what I think I am going to order, I do tent to chuck it all and order the Chef Special once I arrive.  I love experimenting.  And of course there will be drinks, mixed and wine.
Appetizer
Escargot
 Snails prepared in the authentic manner with herbs, garlic butter, and Pernod.
Entree
Twin Duck Breasts
 Grilled, seasoned duck breasts thinly sliced with wild cherry sauce. Served with black barley wild rice and vegetable du jour.
Desert
Chocolate Velvet Torte
 A flourless chocolate torte, covered with chocolate ganache. Served with raspberry sauce. With Cappuccino
 Italian coffee with frothed milk. Topped with whipped cream.


I am so looking forward to tonight.  Not because of the foo (but that doesn't hurt) but because I get my man all to myself, we can laugh about the past and dream about the future together.  Forget about all the day to day drudgery and return to who we were when life was just about us. 
 
I love you Kevin, always have, always will!

Wednesday, August 29, 2012

What Kind of Flower Are You ~ Making it Your's Tutorial

 
Hey Gang, well today marks the start of a fabulous Alice Journey.  This past month I hosted an Alice in Wonderland themed Chunky book swap.  The above page is one of the ones I created.
 
 
I wanted to depict a scene that was not commonly done.  After thinking about it a bit I decided on the "What Kind of Flower Are You" scene.  Easy right, just lots and lots of flowers and Alice.
 
 
Well after gathering some goodies and sitting down to pull it all together I realized why no one has depicted this scene before.  How in the World does one make a Flower that looks like it has a face and moves? 
 
So I drummed my fingers and scratched my head and visited some inspirational blogs and then voila!  Inspiration hit.
 
Do you remember this?  Wendy's Paperclay tutorial on Alpha Stamps Blog
Wendy of Alpha Stamps
Paperclay
Or how about these?  Laura's gorgeous fish.
Laura Carson of Artfully Musing
Mermaid Sandcastle Book and Metal Fish

Well, I decided to mix these two concepts and make them mine.

Making it Yours Tutorial
 
 
I started with the concepts that Laura shared in her tutorial (link above) and pulled out a bunch of flower bits and a face that had a lot of swirls (that resembled flowers).  Alpha Stamps has a fabulous assortment of goodies Flowers/Leaves
 
 
 I twisted and turned and combined and uncombined all these elements until I found the combination that worked for me.  The Green Man Brass Stamping can be found HERE
 
 
Then I switched to Wendy's tutorial (link above) and casted molds of the pieces using Silicone Molding Putty
 
  and Paperclay.
I've tried a few different brands of Paperclay and the creative paperclay that Alpha Stamps carries is the best by far (in my opinion).
 
 
I let mine dry in the mold for about an hour before removing them and placing them on paper towels.  If you are only making one set you can let them dry completely in the molds. 
 
 
As you can see I don't worry about making perfectly clean molds.  I find that it makes the pieces to delicate.  So now I need to clean them up with a bit of cutting and sanding. 
 
 
First things first I needed to make them sit flat.  I flip them over and put them on a soft surface such as a bath cloth and file the back with a large nail file. 
 
  Next I clean up the edges to bring out the detail with a sharp craft knife, I also do a bit of sanding with the nail file. 
 

My finished paperclay piece. 


Here is where I really veered from what was done by Laura and Wendy. 
 
 I paint my paperclay pieces with two layers of pink, one full strength and one mixed with a bit of white. 


Then I do an entire layer of white.  This is all while the paint is wet.


And I dab off some white.  If you leave a fabric or paper towel pattern on your piece spritz it with some water and dab again. 


Now I wouldn't be called the glitter tart if I didn't glitter it up so after the acrylic paint is dry I add a layer of sparkling H2O's


And let this dry completely.  You can add a layer of Modge Podge or Spray sealant if you want it even glossier. 
 
 
Now I switch back to Laura's Fish Tutorial and decorate my arms (the branches) by covering them with Liquid Pearls.


And here is my completed Alice In Wonderland Flower. 
Now it's time to put it all together.  This really is just a lot of layering. 
 

The page is 5 x 5
I mounted the Pink Roses Collage Sheet on top of some book print (to fill in the gaps on the sides) and attached my Flower Creation. 
Of course I had to have an Alice, she comes from the Alice Tea Party Rubber Stamp Set, I colored her with colored pencils.
And covered various bits with Stickles
I computer generated the phrase and called it done. 
 
I hope you like my What Kind of Flower Are you piece and that this tutorial helps you embrace all the fabulous tutorials Alpha Stamps has and make them work for you and your art. 

Now for something you might not have expected...
Curiouser and Curiouser
A Giveaway!


All of these goodies are up for one lucky person.
Collage Sheet images,  samples of all the ribbons I used, carbuncle flowers, the molds I made, and a set of painted paper clay pieces.

How to win???
Leave a comment with the following
1.  Name
2.  Way to contact
3.  MOST IMPORTANT, that you want to be entered in the giveaway.


The lucky winner will receive everything in this cute little hand stamped bag. 
Good Luck all
and come back soon. 

Winner will be announced Wednesday 5th of September.

Thanks for visiting.

Stamp Out Crime ~ Sprinkled With Murder ATC

 
A few months ago the group Stamp Out Crime, a reading and art group, did a read along of the book Sprinkled with Murder by Jenn McKinlay.  It was a lot of fun with prizes and chats and now this ATC and recipe exchange. 
 
 
I decided to depict the character that is murdered with a splash of the heroin.  I like what I came up with, not my normal style but I am very pleased. 
 
 
I reworked one of the recipes in the novel and was going to share that with the group.  But they requested a totally original recipe.  So since fall is right around the corner I shared my Pumpkin Cupcakes with Bourbon Butter cream Frosting.
 
 
I will share my review of this book in the next couple of week.  Meanwhile make sure to check out everything going on, this is going to be an exciting month. 
 
Thanks for looking.

Tuesday, August 28, 2012

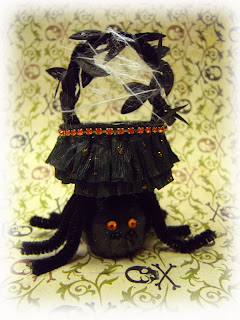
The Spider Ran Away with the Candy ~ Nut Cup Tutorial

 
Ever wonder what happens to all that candy, you know the best candies you hide for "later," well, the spider ran away with them!
 
 
This is one of my Nut Cup creations for Creative Wings Newest swap the Nutty Halloween Swap.  I was kind of thrown by this swap at first, didn't know anything about nut cups but after a few minutes of pondering I got some ideas and I am going to share them with you.
 
A Nut Cup Tutorial
 
 
I found my nut cups at Michael's in the Cake Decorating aisle.  There are two sizes, get the larger one (more details on Creative Wings Blog). 
 
First Paint Your cup, I painted mine in a high gloss black, and I also painted the wooden ball (one side is flat) black.
 
 
Next take a strip of black crepe paper (or color of your choice) and fold it.  Not quite in half, the two layers will give the basket skirt more volume.  I cut my strip twice the circumference of the nut cup (about 12")
 
 
Then run a straight stitch about 1/8" below the fold.
 
 
Once done with the straight stitch.  Push the crepe paper into a loose ring like shown.
 
 
Make sure your nut cup is dry and run a line of glue around the lip (or just below).


Then gently place your crepe paper skirt around the cup, do this slowly making sure all the folds are like you want them.  The crepe paper will tear if you have to pull it off and start over.
 
 
Next I cut a strip of orange rhinestones (aren't they devine!) you can use ribbon, lace, etc also.
 
 
Since I am gluing paper to metal I used E-6000, this stuff is strong so make sure you are in a well ventilated room.  And affix the rhinestone trim.


I wanted my spider to have something that made him look fuzzy, my number one pick would have been flocking but I didn't have any in black so I mixed up some glitter.
 
 
In a small container mix high gloss (or not) modge podge and some black glitter.
 
 
Cover your ball completely. 
Don't worry it will dry clear.
 
 
Next I cut a strip of black pipe cleaner about 6" and wrapped some black leaf ribbon around it.
 
 
And hot glue it into place.  Hot Glue is the only glue that I found that would stick things to the inside of the nut cup because it is lined with some sort of plastic coating. 
 
 
Now put a dollop of hot glue on your spider and plop the basket onto him.
 
 
Time for the legs.  Cut 8 strips of black pipe cleaner about 2-3" long (longer is better because you can always trim later)


Place a dot of hot glue right where the spider and the basket meet and attach the legs one at a time.  Keep the legs close at the top because you can bend them out.
 
 
Now it's time for finishing touches. 
 I added some orange glitter dots to the basket skirt and black to the leaves. 
Painted the inside of the basket black.
Added some fuzzy fiber to look like a spider web.
And of course eyes and fangs. 
 
 
All done, now time to fill him.


This is the view of the piece from the back, filled.  The clip is a glittered close pin with orange and black ribbon wrapped around it. 


Other things that I included are, tickets, Dresden scrap cats, a ghost charm, some brads, lots of ribbon pieces, some black glitter in a bottle, stickers, Collage images and to fill up the box I will be adding one of my patchwork pumpkins.


See how easy that was.  Now go check out Creative Wings Swap.
 I hope to swap with you soon.