Pages

Thursday, April 28, 2011

We have Strawberries...yum!

A few weeks ago my daughters and I made a rainbow garden and the green thumb bit my oldest. Every weekend since then she has wanted to plant something, and I've let her. Two weeks ago we went to Lowes and they had strawberries on sale, so that's what we got.

I'm not sure what this type of pot is really for but I have two and somewhere I thought I saw that they were strawberry pots (but then again that could all be in my imagination). So we

planted our strawberries and waited. The information said it would take 2 weeks for them to produce a strawberry, and right on time, we have a single strawberry! Do you have any idea how hard it is to keep a 4 year old from picking it! I've never dealt with fruit before so I'm not sure when the best time to pick it is but I have a feeling it should get a bit bigger.


Anyway, she is loving all the gardening and we can't wait to eat our strawberries, even if I do have to split one three ways.

Wednesday, April 27, 2011

Shaby Chic Mini Matchboxes

This month the Circle of Friends had an open theme so I decided to try my hand at a mini matchbox.


I feel in love with one that was sent to me as part of a MAMA swap. Melanie of Artful Interludes created this beauty, since receiving it I've learned how to make the little flowers and went hunting for a bird to use. Alas I had no luck and was about to scrap the entire project when Laura at Artfully Musing put up a fabulous tutorial on how to create your own molds.

So with a lovely box for inspiration, the skill and supplies to make the flowers and a way to create a bird I went to work. This is what I came up with.

I covered the matchboxes with a pink and white decorative paper that I stamped some french script on and dusted a bit with brown ink.

The flowers are made from white crepe paper that I embellished with pink glitter and a pink pearl for the center. The leaves I aged a bit with brown ink.

The birds are paper clay that I left white but added a warm ice glitter to. To hide the seems on the side of the box I glued on some lace ribbon. The finishing touch is a word that I covered with crackle glaze.

Inside I painted the box white, added some pink felt and filled with a little gift.

I can't wait to see what the other members of Circle of Friends created. Open themes are always fun!

On a side note, I made a bunch of extra birds (because I love them sooooooooo much) and I've got some on sale in my Etsy store. So hop on over and check them out! If you mention this post I'll knock off the S&H.

Tuesday, April 26, 2011

A very "Royal" Swap & Cup

I've been posting about the MAMA Tea Cup swap for weeks now, but they have all been what I sent, well drum roll please because here is the really fabulous stuff, what I got from Becky!


To remind you real quick about the swap requirements we needed to get our partner a tea cup (English, French, German) some of our favorite tea and a small gift. Becky did an Amazing job (and that isn't showing nearly the enthusiasm I have for what she sent me).


This photo shows absolutely everything she sent me, all the goodies were stuffed inside the bag and I just kept pulling out scrumptious tea bags after scrumptious tea bags and then there is the silver spoon (yep she sent me a silver spoon!) the lace doily the handbag, the tea towel and the cup.


I'll start with the tea cup. It's actually one I've been eyeing for some time now. It's a Royal Vale with french blue or Robbin's egg blue (I never know which is the right description I just know I love the color) and all the flowers are in gold!


I just love the shape of the cup, delicate but yet not something a man would feel uncomfortable holding (at least I don't think so).


The Tea's Becky sent me are going to taste scrumptious when I drink them out of this. She sent a slew of flavors, Organic Apple Red, Cranberry Pomegranate Green Tea, Pomegranate Delight Black Tea (I can't wait to try this one), Constant Comment, Meyer Lemon with honey, French Vanilla, Vanilla Caramel (which is Becky's favorite) and some organic tea. Most of it is caffeine free which I am super excited about because come 4 pm I am always craving coffee or tea and it's too late for me to have caffeine. I'm high energy without the stuff :)


Okay now I'll talk about the beautiful small gift she made me. It's a darling french inspired handbag that I can't wait to show off.


The French image is printed and sewn on she added touches of glitter to it (which of course I love, after all I am the Glitter Tart). The ruffles at the top are scrumptious, I think she used a ruffler, I'll have to ask, I've been thinking about getting one for my sewing machine. And then there are the handmade flowers and lace.


I've taken some close up shots because I can't begin to describe how lovely this bag is. Just look at the fabulous gems she added to the flower.


I think this is my favorite swap so far this year and it might just go down as my all time favorite swap ever! I am thrilled with everything and will be able to enjoy it for years to come.


Monday, April 25, 2011

French Charmed Winnings

This weekend my mailbox was stuffed full of a fabulous item, my winnings from the French Charmed Giveaway! Let's just so that I was super thrilled when I saw my name attached to the winning item, this way to gorgeous for words pillow!


As soon as I found out I won I knew just where I was going to put it. The lonely dinning room chair that sits off in the corner, waiting for DH to come home and sit in it again. When he does get home he may have to share because I love the way it looks there.

If you love anything French you have got to go check out French Charmed, and there newsletter is fabulous!

Thank you so much for pulling my name out of the hat, I will cherish this pillow for years and promise to take very good care of it.

Wednesday, April 20, 2011

Pepto-feather encrusted fiasco!

A few weeks ago I ran across a wonderful tutorial on Sweet Floweret's blog for an Easter Egg Tree. I thought it was a wonderful idea and very kid friendly so I decided to make it with my daughter this past weekend. We made some changes, and well I'm not so sure I like them. To me it looks like the feather monster threw up all over it (sorry).


I knew we were not going to be able to find the eggs used in the tutorial but I had seen some at Michael's that I thought would work, and I am not a fan of the bright green grass so yes, the feather boa was my idea (eak!). Michael's was almost entirely sold out so I had to improvise and bought as many eggs as I could, but I was a bit short.

We came home and got right to work, decided to leave the ribbons on the eggs (probably another mistake) and took apart the egg garland that I had bought to substitute for some of the eggs. With the hot glue gun fired up (and burning me on a number of occasions) we got started. My daughter diligently handing me an egg each time I asked and helping me wind the boa around the Styrofoam core.

As I said we were some eggs short so instead of trying to find some at another store (yep should have done that) I cut the top of the cone off and then glued on the topper.

Well, the topper was yet another mistake in this feather monstrosity, when you have feather overkill don't add more feathers. I love the cute little chicks but they don't do anything but get lost and look stumpy (since I cut the top off funny).

Oh well, can't win them all, and my 4 year old loves it. I don't think it will be making an appearance next year on the table though. Maybe I'll re-do it right.


Tuesday, April 19, 2011

Tea Cup Tuesday - Old English Rose

Time to share another tea cup...this is one I bought for a swap I took part in with the Marie Antoinette Mail Art group.

For the swap we got to say what we liked in our tea cups and she said that she liked pinks and deep reds, roses and a few other things. As you can see I hit the pink, red and roses bit of her request. The swap also required that we include our favorite tea and a small gift. I have already blogged about the small gift I sent her you can view it HERE I also decorated the shipping box which you can see HERE

Okay more about this fabulous tea cup. When I read about my partners tea cup requests I took a swing over to ebay and started perusing. I found a few that I really liked but nothing that fit my partner. That was until I clicked on this image and that was all she wrote. I bought it right away and then went hunting for another one for myself (yes I know I have a problem).

This is an old pattern by Royal Albert that has been re-done a few times. This particular shape of cup is post WWII while the floral design is much older. So if you go looking you will find this design on a number of differently shaped pieces, which to me is cool...they match but yet they don't.

My swap partner received her goodies a few days ago and was thrilled with this selection because believe it or not this is the pattern she has decided to collect for her china pattern. How cool is that, I started her China collection!


Sunday, April 17, 2011

Tea Box

Recently I joined a swap with the Marie Antoinette Mail Art Group, it was for a tea cup, your favorite tea and a small gift. Well, my swap partner received her goodies so now I can share what was inside the shipping box that I blogged about a few days ago.

I got a little carried away with my small gift but boy am I glad I did! The original idea was to make a box to put some tea in but never in my wildest art filled dreams was what came out of me imagined. Michael's is to blame! I was just wandering around when I found the ruffly ribbon (in the bead section) and I knew I had to have it. Then they had a giant thing of pearls on sale and I thought, well why not. The next thing that really got me was a tutorial about how to make backgrounds using paper clay and rubber stamps by Laura Carson over at Artfully Musing.

With all these fabulous element and a new to me technique I got started. My little sister helped me out a lot, I think I sent her about a billion pictures to make sure I was on the right track. I started by sanding and painting the entire box while it was drying I cut the ruffle ribbons to size and sewed on randomly various sized pearls. Between each section of ribbon (where the box turns) I glued a strip of pearls.

Once all the sides were done I moved onto the top. I had already started my paper clay background (it did take 3 days to dry) using my favorite swirl stamp. I painted it to match the box and filled in the swirls with some pink sparkeling H2O and bronze glitter. It looked a little flat still so I ended up dusting it with a bit of brown ink to age it slightly. The paper clay piece shrunk a bit more than I expected so after sanding down the sides I added a strip of pearl to fill in the gap between my paper clay piece and the edge of the box.

One of my favorite things that I did on this box was to create a ribbon to go around the lid's lip. Yep, you read that right, I made the ribbon, and you can purchase some in my Etsy Shop. The ribbon is tea died/stained and then various tea words were printed onto it. Between each word I sewed a pearl. That got wrapped around the entire lid, where the closure is I ended up hiding that they didn't quite meet right with a thin pink bow. I also used a bit of this ribbon on the top of the box.

To finish this off I added a string of pearls, some aged leaves and a bit of ribbon to a box topper, the flower I purchased at Michael's. The last detail is a chipboard spoon that I crackle painted.

I ended up filling the tea box with some blooming tea's, when you drop them in hot water they bloom like a flower, they are gorgeous! Later this week I will share the tea cup that I sent to my partner, which believe it or not, was in the pattern she is going to start collecting.


Thursday, April 14, 2011

Rainbow Garden


This past week when I picked up my daughter from school she said she wanted to make a "rainbow garden." I'm not 100% sure where she got the idea or what she had in mind but this is what I came up with.

The bright containers are sand buckets that I picked up at Michael's for a dollar each. She picked out the colors. Then we headed over to Lowes where she was quite upset to discover that pink was not a color or the rainbow and that there wasn't a green flower.
We compromised and picked a white flower to go in the green bucket and I told her we would plant some pink flowers this weekend. Where is still to be determined, have to figure that one out fast.

I love the bright yellow Gerber daisy and her favorite is the purple, which isn't a surprise since purple is her favorite color. The first thing she did when I turned my back was pick the orange poppy. I told her if she picks them all they won't have any more flowers and then she got upset. This morning she was thrilled when she discovered an orange poppy blooming and she hasn't picked any of the other flowers yet.

I'm linking this up to Fishtail Cottage's Cottage Flora Thursday's...come see all the wonderful gardens!

Wednesday, April 13, 2011

Tea Cup Swap goes Postal

I know, I know, crazy to decorate a shipping box. But I just couldn't help myself. I'm so excited about what's inside that I had to make the outside look just as good (actually the inside is better).


So this is the box that my latest MAMA swap is being delivered to my partner in. The swap was for a tea cup filled with your favorite tea and a small gift. I'm not going to let one peep out of what's inside until my swap partner receives it...after all shouldn't she be the first to lay eyes on it???


Then I guess that leaves me to discuss the shipping box. It was actually a fast creation. I painted it with pink acrylic paint, stamped a swirl randomly all over (this part you can't see) in a soft linen shade and then highlighted a few of the swirls with gold glitter. The flowers are cut out of a decorative paper and glued on. Then I stamped all the tea paraphernalia and did a bit of distressing with Tim Holtz inks to give it a not so flat look.


I hope my partner enjoys what's inside. I'll be posting the contents as soon as she gets this.

Treasures of the Sea Swap Announcement


I was doing a little blog surfing the other day and I kept running across a swap that looked divine. It was called, Things with Wings, and it was an altered Matchbox. I say was because it was over which made me a bit sad. That was until I found out that the hostess is doing another one and this time it is Sea themed...and y'all know that is one of my favorite themes.

However I've never done a swap outside of my groups so I wasn't sure I wanted to join. I thought it over for a few days and finally decided to take the plunge, so to speak.

I am now signed up to swap a Treasures of the Sea Matchbox and I can't wait to get started. Come check out the rules and guidelines (scroll down on the above page) and join us!

Tuesday, April 12, 2011

Tea Cup - Lynton

This week for Tea Cup Tuesday I am sharing my very first tea cup. I love the cobalt blue and gold accents on this dimi cup. I've never used it and probably never will I've always thought of it as decoration, a keepsake from a friend.


When Kevin and I lived in Mississippi the first time we lived in a small apartment complex that was older than dirt. A lovely lady named Catherine Flinn had lived there since they were built, she was now a widow and knew no one. We became friends and would have drinks together some nights.

One day she told us she was moving into assisted living, which we thought was best but would never tell her, she had no family. Anyway long story short she gave us this lovely tea cup as a gift. She had a nice collection and I am honored to have one of her cups.

Now that I have started a collection this cup means more to me than any of the others and I know it always will.

Monday, April 11, 2011

Spring Cleaning

This week the theme at One Powerful Hour is...

Spring Cleaning

And boy do I need to get some of that done. But to me it's a four letter word! On top of that, I couldn't wrap my mind around an art project that really featured spring cleaning. So I bit the bullet and did something I've been needing to for a long time. I cleaned up all those odds and ends that pile up on the desk.


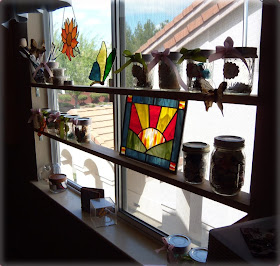
A few weeks ago when I was at the grocery store I purchased a bunch of mason jars. I put all those odds and ends into 12 different jars. Each jar has it's own theme which I hand wrote onto a punched out piece of decorative paper that I added glitter to the edges of.

To spruce up the jar I wrapped the lid in a silky grey ribbon and then glued a bow onto it. The jars themselves took very little time to decorate, and separating out all that stuff on my desk actually didn't take that long either, once I decided to do it.

The question was what should I do with the jars. After all desk space is already maxed out. So I took a note from one of my favorite space saver/decorating magazines and decided to utilize the window.

Believe it or not putting all this up in the window also took less than an hour. It did however require a trip to the hardware store. I had the wood but not the hardware. I wish the wood panels were glass, maybe I can switch it out in the future.


On top of getting all those bits and pieces off my desk (which is still covered with stuff but getting better) I also managed to find a new home for all my paintbrushes and for two of my stained glass window pieces that were collecting dust at the bottom of a pile of papers on my desk...can you believe I let them just sit!


I am not 100% pleased with the window shelves but for a 1 hour project I think I did really well. And I have a ton more space so next time the "stuff" starts to take over again I'll know what to do.

Saturday, April 2, 2011

Welcome Alpha Stampers!

Hey all you fabulous Alpha Stampers welcome to my blog. Wish I could be here to greet each of you, usher you into the door, take your coat and hand you your favorite beverage (I'm serving everything coffee, tea, memosas etc...) but alas I can't. Please sit back and enjoy the eye candy, feel free to ask questions, I promise to get to each and everyone one in time, and then move onto the next blog.


I created this piece especially or shall I say in honor of todays "visit." The background paper, colage images, and ribbon can all be found at Alpha Stamps.


I used the fabulous metal alphabet and number set for the first time on this project, so I got to learn something new. Thank you if you helped me through the process of finding a bench block and answering all my questions.


Now onto the fun stuff!


I have some Spring themed blog candy for one special hoper. All you have to do is leave a comment that you passed through.

Some of the wonderful odds and ends included are:

Purple Feathers

2 Giant Fabric Leaves

Domios

Bottle Caps

3 different ribbons

spring themed collage images (AS of course)flowers

crepe paper cut outs to make the flowers

etc etc etc...


I filled this lovely organza bag to bursting with the goodies. And it needs a new home.

I'll announce the winner on Monday April 4th in the Yahoo Group and you'll have 24 hours to claim it or I draw again!

Hope you enjoy your time today on my blog.

Thanks for stopping by!

Friday, April 1, 2011

New Items for Sale


I just got done posting some fun new things into my Etsy store. Among them are lavender and rose sachets, and a ton of brilliantly colored clothespin magnets (the uses for these are endless). For the month of April I am also offering Free Shipping & Handling on all cocktail napkins. So go check it out!