Hey Gang, yesterday we finished part 2 of our Pagoda, leaving it without a roof.
Well, let's get to it. After this tutorial you will be all done. Now, please don't let the mathematics scare you, it's just simple geometry I promise.
The first thing you need to decide is how tall you want your roof to be.
I do this by placing a ruler next to my structure and eyeballing. For my Pagoda I choose 2 1/2 inches tall.
Once you have determined the height, measure the length of the banner. If you are using those provided by Alpha Stamps they are 2 1/2" wide.
With these two measurements everything is easy.
You are trying to determine the long side of a Right Angle Triangle
a= 2 1/2 (the height)
b= 1.25 (half of the base, because you split the triangle to make it a right angle)
c= unknown
I hope you can see my formula above c= the square root of a squared plus b squared.
a squared = 6.25
b squared = 1.5625
a + b = 7.8125
c= the square root of 7.8125
c= 2.795
So now we know all the sides
a= 2 1/2 (height)
b = 2 1/2 (length, you don't want to split it now since we need to make the entire triangle)
c= 2.796
Draw your triangle out using these measurements and then add 1/4 inch to all sides. These will be folded and used to attach to the sides.
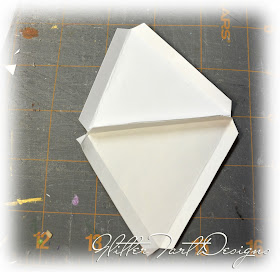
Once cut out and folded your triangle should look like this.
You will need 4
Connect the sides c to one another with glue or double sided tape.

Connect all four so you have a pyramid and then add glue or tape to the portion that will attach to the Banners and affix the roof to your Pagoda.
Voila! See, not that hard.
Now decorate the roof as you please. I used layers and layers of seam binding and then added some stick pins with heart confetti.
Some of my other finishing touches were the brass cherubs I patina yesterday, a bit of seam binding to hide what is under the floor of the Pagoda and some German Scrap.
I hope you have enjoyed this tutorial and have fun creating your own Mini Pagoda!
Don't want to make your own, well, I have this one on sale in my Etsy Shop.


Very cool. Great tutorial...pictures are so helpful. I would have never thought the roof was made like that. Then you see the pictures and think, of course! Love it
ReplyDeleteKaren
wow, Caroline, you've put a lot of work in this. What a great project, it's gorgeous!
ReplyDeleteI've put your giveaway on my blog with a link to yours. Hugs and happy week(end), Wendy (of Apple and Apricot)