Pages

Sunday, September 27, 2009

The Secret History of the Pink Carnation Bookmark

So tomorrow night I am hosting Book Club for the new book club I am in. I selected one of my all time favorite books, The Secret History of the Pink Carnation by Lauren Willig. A fun light historical fiction mystery romance that is sort of a continuation of The Scarlett Pimpernel (another of my favorites).

Because I can't just have people over, after all what fun would that be LOL. I decided to make everyone bookmarks. It is not my best work but I had a number of things working against me...the biggest one being time. I just finished the bookmarks and tomorrow is the meeting.

To start I cute the base cardstock a light pink. Then I cut/tore strips of white paper, the edge that I tore I dusted with gold ink. Onto the white cardstock I stamped a French Script (the book partially takes place in France). Stacked the pink and white cardstocks and then stamped the pen nibs from Alpha Stamps along the left hand edge. The flower is from a new company I've discovered Art Neko Rubber Stamps. I used Marvy markers in various shades of pink, purple and green and stamped the carnation directly onto the bookmark. Next I printed out the title of the book onto the same color paper as the base cut the words out glued them down and finally highlighted them with a bit of gold. As a finishing touch I edged the bookmark with gold and attached green, gold and pink fibers.

I hope the women who are coming to the meeting have a great time and enjoy the bookmarks. And I hope I get to keep one...more and more people keep telling me they are coming I'm starting to wonder if I have enough food!

Thursday, September 24, 2009

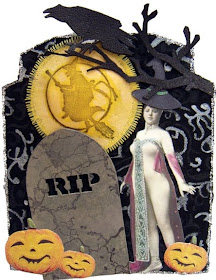
Haunted House Swap


Here is my latest contribution to the fabulous Alpha Stamps Swaps. The swap this time was to create 7 "Halloween themed houses" we had to use the house shapes and various images/stamps from Alpha Stamps.


I really took some time to come up with a plan for this swap. After perusing all the sale items (for yahoo group members only so you should join!) I decided I wanted to take a slightly different approach.


I had fallen in love with the tombstone and tree chip board cut outs and wanted something to "hide" behind them. Heading over to the fabulous array of collage images I found these great Paris Show girls...and well what else would make a perfect witch than a show girl (LOL).


Found a few accent stamps and voila I was off.


To start with I wanted to use a velvet fabric that I would iron on a slight swirl image but I had never done that before and had heard that the fumes were bad, plus I was worried about melting my stamp. I was also under a bit of a time crunch so I checked out what fabrics I had and low and behold I had a perfect black cotton with a dark dark grey intricate swirl pattern (that alas did not show up well in the photo's).


Next I stamped the witch on a broomstick on to yellow fabric that I highlighted with an iridescent red paint (to tone down the yellow) and I sewed that onto the black fabric before covering the house.


On a few of the houses I painted in a bit of the swirl pattern using a pewter shimmery paint. I couldn't decide if I liked it or not do I only did half that way.


Next I hand painted the chip board parts using various shades of either grey (for the tombstones) or brown (for the tree). To get an aged look on the tombstones I stamped them with a cracked background stamp. I wanted the tree's to have a bit more personality so I added some "knots" that I hope look like a scary face but I think just look cheesy...oh well, after all I'm not a painter.


The Crow on the branch is stamped/embossed onto chip board. I just bairly tacked it down so that it sticks out over the moon which I gave a raised effect to by placing batting behind the center of the moon.


Finally everything was ready to go on and it was just a matter of placement. When I got everything on I realized I wanted some more color so I added the pumpkins that I originally got in last months Paula's Kit Club but was ecstatic when I found that Alpha Stamps was carrying them also.


Long story short...these were quite a bit of work but I think it was well worth it. I hope the swappers that receive them like them. I had a great time making them and learned quite a bit.


Friday, September 18, 2009

"R" Cocktail Napkins


Here is my latest set of cocktail napkins. Once again they are for a wedding gift and it seems very popular right now to have black dishes mixed with pewter accents so in an effort to the napkins "match" the couples china here is what I came up with.

The customer requested that I try adding a swirl behind the monogram and that I offset (angle) the letter. So after playing with a few different swirls I settled on the one you see and I did offset the letter. But instead of just putting the swirl behind the letter it goes all the way around the napkins edge.

There are a few things that I would do differently if I had these to re-do but all in all I am pleased with the way they turned out. They are not my taste but they are well put together and amazingly (since I have had a ton of practice recently) almost all exactly the same size!

I am pretty sure if you click on the photo it will enlarge it.
Here is the gift box that the napkins will be sent in. Originally it was a bronzish brown box with a brown ribbon. I loved the floral texture that somewhat emulated the swirl I used on the napkins. The final effect I got was not what I was originally going for but some accidents are good.

The plan was that I would paint the entire box silver let it dry and then go over that with a wash of black and wipe off the "raised" area's leaving them silver and the remainder of the box black. Well, it didn't wipe off as well as I expected but I really love the pewter type finish it gave the box.

The ribbon I had to paint also so it is a little stiff but it still made a nice bow and it is much better than if I had tried to replace it.


Here is a close up of the napkins from the above picture. I tied them together with a black organza ribbon.

Below you can see a larger photo of the close up of the swirls and letter "r". You can also see more of the silver paints that I used on the napkins. This time I used two various shades giving the napkins even more depth.

I really hope the customer and the receiver likes this set.


Wednesday, September 16, 2009

Alcohol Ink ATC Class

A few weeks ago I took my second ATC class from Lisa at La Femme Papier.

There was no way I was going to miss a chance to play with Alcohol Inks...one of my favorite things. Lisa really didn't show me anything that I had not learned on my own but it was fun to see how other's used this fabulous product.

The ATC on the right is the one that I made. I used a printed transparency and coated it with a yellowish Alcohol Ink, so you can actually see through my ATC!

The pumpkins are stamped on glossy paper and colored with two shades of orangish alcohol ink. And last but certainly not least I used a green alcohol ink to tone down the gold glitter paper I used around the edges. To add a bit more texture I used the new Tim Holtz Distress sticklers to add some "swirls" coming off the pumpkins.

I am really pleased with the way this ATC turned out and love the one that I received in the exchange which is here to the left.

Thank you Jackie C. for the lovely ATC I love the movement and the colors you used and have a special place for it all set up in my ATC book.

If you haven't taken one of Lisa's ATC classes and you live in the area, you really should :)


Monday, September 14, 2009

Andrea's One Powerful Hour Entry


A good friend of mine, and member of The Circle of Friends, has created this piece for this weeks One Powerful Hour Challenge...

Back to School

She however does not have a blog so I decided to post it for her on mine. Please leave your comments for her here and I will make sure she stops by and gives it a look.

Thank you Andrea for taking part in this weeks One Powerful hour...

and for those of you that are regulars look for more of Andrea's work in the future, she is going to be one of the Guest Designers coming up!